

Beef and Cheese Enchiladas
- An easy, flavorful, and oh-so-satisfying weeknight beef enchilada recipe. Made with ground beef, refried beans, enchilada sauce, tortillas and cheese. Ready in less than 45 minutes.
I love enchiladas, but enchiladas take effort. They are definitely a cooking project rather than a weeknight dinner.
Until now. These beef and cheese enchiladas are flavorful and satisfying and come together quickly enough to make on any given weeknight.
They come together quickly because there are only FIVE ingredients: ground beef, refried beans, enchilada sauce, shredded cheese and tortillas. That’s it.
You can even make them ahead of time. Just assemble the enchiladas and pop them in the fridge until you’re ready to cook them.
Why This One Is Worth Making
- Ready in less than 45 minutes.
- Uses only 5 ingredients.
- Flavorful beef mixed with creamy beans makes a flavorful and satisfying dinner.
- Assemble ahead of time. Just pop them in the fridge until you’re ready to bake them.
Beef Enchilada Ingredients You’ll Need
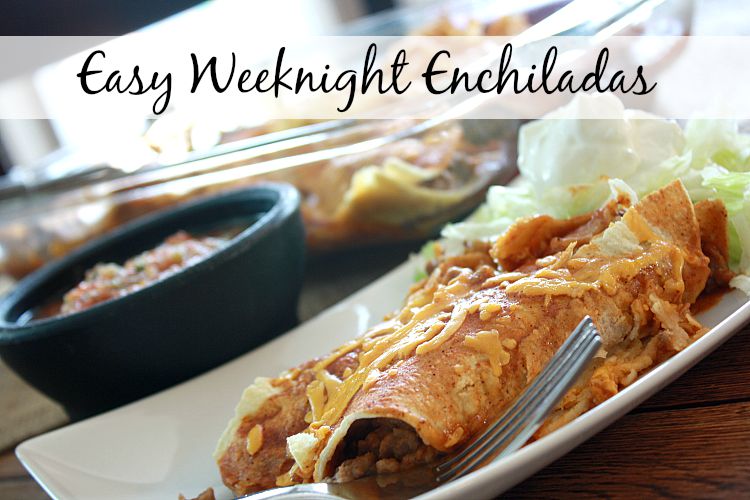
- 1 pound 80/20 ground beef
- 1 can refried beans, traditional or fat-free
- 1 can enchilada sauce, red, 10 oz is a regular size
- 2 cups shredded mild cheddar cheese, about 8 oz, you can use Monterey Jack or Mexican Blend, etc. Cheese that was shredded by hand melts better
- 10 flour or corn tortillas, soft taco size, 6-8 inch tortillas work well
- toppings, sour cream, shredded lettuce, diced tomato, hot sauce, sliced jalapeno’s, etc.
Corn vs Flour Tortillas: Our family prefers enchiladas made with flour tortillas. Flour tortillas are easier to work with and roll up nicer which means less falling apart in the pan.
Corn tortillas do have a more traditional flavor and firmer texture though. If you’re using corn tortillas, I would warm them before assembling.
Corn tortillas like to crack and break. Warming them makes them softer and more flexible to work with.
Most kids prefer flour tortillas as well.
Refried Beans – These are what make this recipe. The beans help thicken the mixture which will help everything stay contained when you roll up your enchiladas.
You might be surprised how creamy and delicious this mixture is. We love combining beef and beans together.
The creamy texture compliments the beef instead of drowning out the beefy flavor.
Enchilada Sauce – The enchilada sauce not only seasons this recipe, it keeps the tortillas from turning into a crunchy, dried-out, inedible mess.
Note on tortilla size: Use tortillas that will lay flat in your pan and don’t hang over the sides. Tortilla size matters to help keep the ratio of filling to tortilla just right.
Tips on Cheese: You can use shredded cheddar, a Mexican blend, Monterey Jack, etc. Try to use cheese that has been shredded by hand, not pre-bagged shredded cheese, as that will melt the best.
If you want to prep ahead, shred your cheese ahead of time. Prep helps when it is time to roll and assemble.
WHAT CHEESE TO USE
You can use a Mexican cheese blend for more complex flavor. Mild cheddar, however, melts up beautifully and pleases just about everyone.
We recommend shredding your own, but pre-shredded works fine here since the cheese’s anti-caking agents get masked by the enchilada sauce and the heat of the oven.
DRAIN THE BEEF
Beef sheds a lot of fat as it cooks, and whatever you do, don’t skip this step. Leaving it in makes for a greasier filling and can make the tortillas soggy, though.
Drain the fat by tilting the pan and using a spoon to remove it, or dump the beef into a colander. Make sure it’s well-drained before stirring in the beans.
SOFTEN THOSE CORN TORTILLAS
If you’re using corn tortillas, which are less pliable and have a higher tendency to crack and split when you roll them up, wrap them in a damp paper towel and microwave them for 45-60 seconds. Flour tortillas are softer and don’t require any massaging.
Grab ’em outta the bag and roll ’em up.
WHAT YOU NEED TO KNOW BEFORE YOU START
Spray your pan. Trust us on this: Use cooking spray to coat the bottom of a 9×13 pan to prevent the tortillas from sticking and breaking apart.
Place enchiladas seam-side down. Keeping the tortilla seam-side down helps them stay rolled up and closed during baking.
Their own weight keeps them from uncoiling.
Beef and cheese enchiladas with enchilada sauce are simple but impactful in flavor. You can make them in advance and bake right before serving.
Or, assemble them in a disposable foil pan and include directions for reheating to give to someone.
Make it ahead if you need to
Once assembled, cover with foil or lid and refrigerate up to 24 hours ahead of baking. Add 10 minutes to the baking time if baking from refrigerated.
How to Make Beef and Cheese Enchiladas
- Preheat the oven to 350 degrees. Lightly grease a 9×13 dish.
- Cut a paper towel in half and dampen it. Lay the corn tortillas in a single layer on a plate and top with dampened paper towel. Microwave for 45 seconds. Remove from microwave, separate tortillas, set aside and repeat with remaining tortillas. Set aside.
- Add the ground beef to a large skillet and cook over medium-high heat about 7 to 8 minutes until browned and cooked through with no pink. Drain.
- Add the refried beans
Add a can of refried beans to the beef and stir until combined over medium heat. Continue to cook, stirring constantly, for another couple of minutes or until heated through.
The beans will loosen up a bit when heated. Remove from heat.
You want the mixture to be an even, thick consistency, not too thick/dry and not runny.
Step 4: Assemble the enchiladas
Lay out one tortilla, about the size of a taco shell, and add about 3 Tablespoons of the beef/bean mixture in a pile across the middle of the tortilla. You can sprinkle a little cheese over this, totally up to you, before rolling.
Roll up tightly and place, seam-side down, in a 9×13 pan. Repeat until all enchiladas are rolled, then place in the pan so they’re all touching, and there will be two rows of 5.
Step 5: Add sauce and cheese
Drizzle enchilada sauce over the top of the enchiladas directly from the can. Make sure all tortillas get some, otherwise the ends of the enchiladas will be a bit dried-out once baked.
Use the back of a spoon or a baster/brush to make sure the enchiladas are evenly coated with sauce. Sprinkle the remaining cheese over the enchiladas.
Step 6: Bake
Cover the pan tightly with foil and bake for 25 minutes in a pre-heated 350°F oven, removing the foil during the last 5 minutes of baking. The enchiladas will be bubbly, the cheese will be melted and the enchiladas will be heated through.
You can remove the foil for the entire 25 minutes if you like, but I like to keep the cheese from browning until the enchiladas have been heating for a bit. The cheese will brown and bubble nicely during the last 5 minutes of cooking.
Step 7: Serve
Allow the enchiladas to set for a few minutes after removing from the oven, which will help everything set-up a bit and makes them easier to cut into even portions. Top with sour cream, lettuce, hot sauce, whatever makes you happy.
Serve alongside Spanish rice, cilantro lime rice, and even a little more refried beans… YUM!
Tips for Better Enchiladas
Don’t overfill the tortillas. As noted, use about three tablespoons of beef/bean filling per tortilla.
Any more than that and they’re very likely to burst in the oven.
Make sure the enchiladas are coated in enchilada sauce. Any exposed ends will likely cook-up a little too well-done/dried-out.
Make extra filling. Trust me, you’ll be glad you did.
Any additional filling can be spooned onto the side of the dish, mixed with the enchilada sauce. Alternatively, you can store any extras in the refrigerator for later use as taco or nacho filling.
Spice up the filling. This recipe focuses its flavor and spice in the enchilada sauce.
However, if you’d like a little more kick and complexity in your enchilada filling, add about 1 teaspoon of cumin, 1/2 teaspoon garlic powder and a pinch of chili powder as the beef is cooking. It’s a simple addition that makes a big difference.
Shop around for enchilada sauce. Not all cans of enchilada sauce are created equal.
Some are too thick, others too thin. Some are fiery and others are tame.
Some are balanced in flavor, others are off-putting. Take the lid off the can and give it a taste – whatever flavor profile you encounter when tasting straight from the can will be reflected in the enchiladas.
Find a brand you love, and use it again and again. My family’s current favorites are Old El Paso and Las Palmas for a true-to-form enchilada flavor.
If you’re looking for some heat, Hatch enchilada sauce has us covered. Avoid enchilada sauces that smell overly sour or have a metallic flavor.
Believe me, baking doesn’t make them taste any better.
Make two batches for the freezer. When making these, consider doubling the recipe, assembling two pans of enchiladas and reserving one to freeze.
Simply cover the unbaked enchiladas tightly with plastic wrap, then foil and pop into the freezer. When ready to enjoy, transfer to the refrigerator the night before to thaw.
When ready to bake, add about 10-15 minutes to the baking time. It’s wonderful to pull a freezer-baked casserole out of the oven on a hectic weeknight.
Use a 9×13 glass or ceramic baking dish. The enchiladas bake up best in a glass or ceramic 9×13 baking dish.
A glass baking dish also makes it easier to peer inside to see if they’re releasing lots of liquid at the bottom of the pan. You can also use metal pans which may overcook the enchiladas on the bottom.
If you must use a disposable pan, invest in heavier duty foil pans. The cheaper, thinner pans buckle under the weight of the enchiladas and allow the sauce to escape.
Leftover enchiladas will keep for 4 days in the refrigerator. Store leftovers in the same baking dish covered with foil or transfer them to an airtight container.
Frequently Asked Questions
Can I make this ahead of time?
You can bake the enchiladas ahead of time and store them in the refrigerator and reheat when ready to serve. To reheat a single portion in a microwave, cover the enchilada with a dampened paper towel and heat for 2 minutes; this prevents moisture from being sucked out of the enchiladas.
To reheat enchiladas in an oven, place enchiladas in a baking dish, cover with foil, heat in a 325°F oven for about 15 minutes.
You can also freeze enchiladas. Freezer instructions are below.
Freezer Instructions
Enchiladas bake beautifully but tortillas become a bit soft after baking and freezing. This is the hardest part of freezer enchiladas, which is the texture.
The taste will be delicious, it’s the texture that will be different.
Freezing already-baked enchiladas: Allow enchiladas to cool and transfer to an airtight freezer-safe container. Freeze for up to 2 months.
To serve, remove desired number of enchiladas from freezer, place on a microwave-safe plate and heat on 50% power for 3-4 minutes and on full power for 1-2 minutes.
Freezing unbaked enchiladas: Assemble enchiladas and transfer to an oven-safe dish. Cover tightly and transfer to freezer.
To serve, thaw enchiladas overnight in refrigerator. Remove from refrigerator and bake as directed.
Freezing enchiladas before baking retains their original flavor and texture. Freezing before baking is best for meal prep or giving someone else the dish to bake in their own oven.
Can I use corn tortillas instead of flour?
Flour tortillas are more flexible and easy to use. Most kids prefer enchiladas made with flour tortillas too.
Corn tortillas are the more conventional tortillas used for enchiladas and add substantial body and chew to enchiladas. However, corn tortillas can be tricky to work with.
When cold, they are less flexible and can easily break and crack which means cracked and broken tortillas in the final enchilada dish. To make tortillas easier to work with, stack together, wrap in a dampened paper towel and heat in a microwave for about 45 to 60 seconds.
Tortillas will be flexible and much easier to roll around fillings.
Can I make this in advance and bake it later?
Yes! This is a great make-ahead dish.
Follow the recipe as directed, making the filling, assembling the enchiladas and pouring on the enchilada sauce and cheese. Cover tightly in foil and refrigerate up to 24 hours.
When ready to bake, transfer directly from refrigerator to oven. You’ll probably need to add about 10 minutes to the baking time.
They’re just as good made ahead of time and refrigerated!
What can I substitute for refried beans?
Black or pinto beans would be fine. Just drain them well and give them a mash with a fork, but not too fine or the filling won’t hold together and will fall out of the tortillas.
You could leave the beans out altogether, just increase the beef. They will be a bit dry without the beans though.
Refried beans are the easiest.
How many enchiladas does this make?
This recipe makes 10 enchiladas if you’re using smaller, 6 to 8 inches in diameter, taco-size flour tortillas. This will make a heaping plate of enchiladas for 4-5 servings.
For example, you could easily feed 4-5 people these enchiladas as an entrée (two enchiladas each), or you could feed 6 if they were being served alongside rice.
Can I use ground turkey instead of ground beef?
You could use ground turkey, though the enchiladas won’t be as rich. Ground turkey does have less fat.
You’ll want to add a bit of seasoning to compensate for the flavor though. I’d add a tsp of cumin and maybe some garlic powder.
My enchiladas are dry.
What happened?
There are a couple of reasons enchiladas get dry:
- Baked uncovered. We recommend covering with foil for most of the baking time so they remain moist.
- Tortillas not fully coated with enchilada sauce. Be sure to pour enchilada sauce over the ENTIRE enchilada as well as the ends. If you find you don’t have enough enchilada sauce as some cans are smaller than others, add a splash of water to the sauce to make sure there’s enough.
- Baked too long
Can I add more to the filling?
Yes! Some ideas: diced green chiles, corn, black olives or onion, cooked along with the beef, are all great additions.
Assemble enchiladas just as directed.
Beef Enchiladas make a great, simple dinner. They’re easy to make and kids and adults alike love enchiladas.
If enchiladas aren’t normally on your menu, I’d highly recommend adding them.
Enjoy your enchiladas.
More Dinner Recipes You’ll Use
Shredded Beef Enchiladas: These hands-off Crock Pot enchiladas use shredded beef and red enchilada sauce.
Chicken Enchilada Soup: All of the flavors of enchiladas in a delicious crockpot soup, perfect for a chilly evening.
Pulled Pork Enchiladas – These enchiladas are filled with slow-cooked pork and covered in a creamy poblano sauce.
Beef and Cheese Enchiladas
Equipment
- 9×13 baking dish
- Large skillet
Ingredients
Ingredients
- 1 pound ground beef
- 1 can refried beans
- 1 10-ounce can red enchilada sauce
- 2 cups mild cheddar cheese shredded
- 10 flour or corn tortillas soft taco size
- cooking spray for the baking dish
Instructions
Instructions
- Preheat the oven to 350°F. Lightly grease a 9×13 baking dish with cooking spray.
- Cook the ground beef in a large skillet over medium-high heat, breaking it up as it cooks, until browned with no pink remaining. Drain the fat.
- Reduce heat to medium. Add the refried beans and stir until combined with the beef and warmed through. Remove from heat.
- Spoon about 3 tablespoons of filling down the center of each tortilla. Add a pinch of cheese if desired, roll tightly, and place seam-side down in the baking dish.
- Pour the enchilada sauce evenly over the rolled enchiladas and spread it so every tortilla is coated. Sprinkle the remaining cheese over the top.
- Cover tightly with foil and bake for 25 minutes. Remove the foil for the last 5 minutes if you want the cheese bubbly and spotted.
- Let rest for a few minutes before serving with toppings such as sour cream, lettuce, tomato, jalapenos, or hot sauce.