
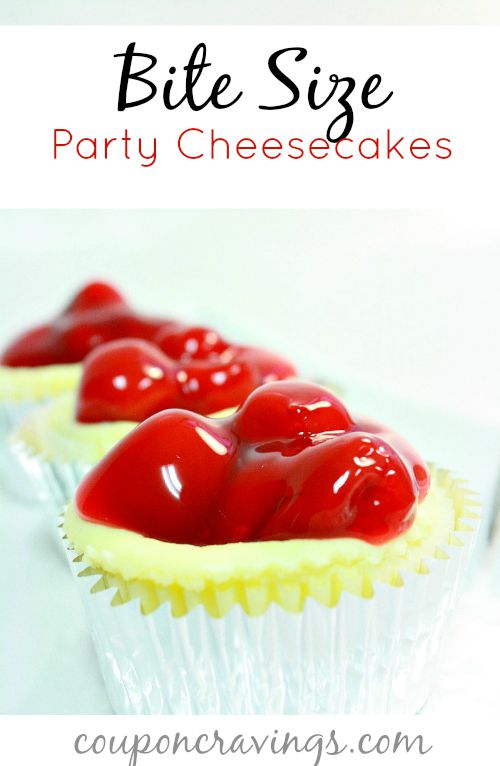
PARTY CHEESECAKES
When it comes to celebrations, party cheesecakes are my absolute favorite treat.
Mini Cheesecakes are one of my favorite desserts to bring to events. They’re easy to make and incredibly delicious.
WHAT MAKES THIS TREAT SO GOOD
Mini Cheesecakes are easier to make than their larger counterparts and taste just as incredible. In my opinion, there’s two tricks to make them easy:
- Using a single vanilla wafer for the crust. Simply drop the wafer, flat-side down, into a greased muffin pan to make an easy vanilla wafer crust. There’s no need to crush up the cookies and mix with butter. The cookies will bake into a solid base that will stay together even if lifted by hand.
- Baking in a muffin pan. Muffin tins mean there’s no need for a water bath and a springform pan. Cheesecakes also bake quicker and more evenly when made as Minis. Finally, there’s no need to slice them either, as each cupcake-sized cheesecake is a serving.
WHAT TO KNOW BEFORE YOU START

Do not rush your eggs! Since you’ll be adding them one at a time, once you have the cream cheese and sugar to a nice consistency, make sure to fully beat each egg in before adding the next.
The batter should be quite thick and creamy at the end. It might have been added too quickly if it seems too runny.
Yields: 12 mini cheesecakes Prep Time: under 30 min Difficulty: Easy
Party Cheesecakes are easy to make and fun to bring along to parties. Learn how to make Party Cheesecakes here.
- two 8 oz. packages cream cheese, full fat, brick style, softened
- 1 cup sugar
- 1 teaspoon pure vanilla extract
- 2 large eggs, room temperature
- 24 vanilla wafers or other vanilla flavored cookie
Party Cheesecakes are a favorite of mine to make and bring along to parties. They’re cute and adorable, they’re easy to make, they’re delicious, and you can top them with pretty much anything.
I have to admit, cheesecakes can be a little intimidating to make, especially for beginning bakers. So if cheesecakes have been on your list of desserts that you’d like to learn to make, this is an awesome recipe to start with.
The ingredients in Party Cheesecakes are basic and easy to find. There are only six ingredients and they’re probably sitting in your kitchen as we speak.
You can whip these beauties up in less than 30 minutes, which is a perk for sure.
Softened Cream Cheese. I recommend leaving your cream cheese out for an hour or two.
You need brick cream cheese – the full fat kind that comes in a foil packaging. Spreadable cream cheese, the kind that comes in a plastic tub, has other ingredients in it that will affect the texture of the cheesecakes.
It will not set properly.
Sugar – Please note that I used regular white sugar in these mini Party Cheesecakes. If you choose to make these with powdered sugar the texture of the end result will be different.
Room Temperature Eggs – You can leave your eggs on the counter while you get your other ingredients ready or place them in a bowl of warm water for 5 minutes. Leave them in the shells.
Vanilla Cookies – Any type of vanilla flavored cookie will do. I like to use vanilla wafers because they’re thin and fit nicely on the bottom of my mini Party Cheesecakes.
Preheat oven to 350F. Place paper cupcake liners in a regular 12-cup muffin tin.
Place one cookie in each liner. Set aside.
Cupcake liners are important for these cheesecakes. If you don’t use them, the cheesecakes will stick to the pan & won’t come out clean.
The liners come off easily after you chill the cheesecakes, so don’t think of them as an optional step!
In a large bowl with an electric mixer on medium speed, beat the cream cheese until it’s smooth, about 2 minutes. Add sugar and vanilla and beat for about 30 seconds.
Stop and scrape sides of bowl. Add eggs, one at a time, mixing for about 30 seconds after each addition.
Do not over-mix the batter.
Fill each prepared muffin cup about ¾ full. A cookie scoop works best for an even fill.
I used a 1.5 tablespoon cookie scoop. Do not overfill, the cheesecakes will rise a bit above the liner.
Bake at 350°F for 15 to 20 minutes, until the tops are set but the center of each mini Party Cheesecake still jiggles and edges are slightly golden. Trust the jiggle.
They will continue to cook as they cool. Removing them from the oven when the center is no longer jiggly will result in over-baked mini Party Cheesecakes.
Place the muffin pan on a wire rack and let the Party Cheesecakes cool at room temperature for 30 minutes. Remove from pan and allow to finish cooling.
Cover and refrigerate for at least 2 hours.
Once fully chilled, fill mini Party Cheesecakes with toppings of your choice. Serve and enjoy.

HELPFUL TIPS
The most common mistake in cheesecake recipes is not softening the cream cheese. You can work the lumps out, but it’s very hard to do.
You’re better off leaving it out for an hour or two.
I like to use a hand-held electric mixer for recipes like these. They’re small batches so it’s easier to get a feel for the batter with a hand-held.
These can be made with a 5 speed hand mixer, mix ingredients on low and increase to medium to combine them. If you are only making one batch, there’s no need for a stand mixer.
Trust the jiggle. The centers will cook as they’re cooling.
If they’re not jiggly at the center, your Party Cheesecakes will be over-baked.
If you notice cracks in the tops of your mini Party Cheesecakes don’t fret. It won’t affect the flavor or texture and toppings will hide them.
Party Cheesecakes taste even better after being in the refrigerator overnight, so plan accordingly. They’ll be much more set and hold up better if you’re taking them along to parties.
I’d recommend waiting until you got to the party to fill them with toppings so they travel easier.
Fill them with cherry pie filling, chocolate sauce, strawberries, blueberries, raspberries, pretty much anything.
VARIATIONS AND TOPPING IDEAS
- This recipe makes 24 mini cheesecakes. If you’re entertaining a large crowd, double the recipe and use two muffin tins. It doesn’t change the baking time.
- Many people love the way the crispy vanilla wafer crust turns into a soft, cake-like crust after the mini cheesecakes have been in the fridge overnight. Personally, I like them best with a crispy crust, so I like to enjoy them the same day they’re baked.
- The recipe itself is pretty basic. It lends itself perfectly to an array of toppings. Use your imagination. Change up the toppings for special occasions.
Cherry pie filling – Use a 21 oz. can of cherry pie filling. There’s plenty for an entire batch with a bit to spare.
Fresh strawberries – Slice fresh strawberries and sprinkle with about 1 teaspoon of sugar. Allow to sit for 10 minutes and spoon onto mini cheesecakes.
The strawberries will make a little bit of a sauce.
Chocolate drizzle – Equal parts chocolate chips and heavy cream heated until chocolate chips melt makes a simple chocolate drizzle/ganache, which takes about 5 minutes.
Blueberries – Canned blueberry pie filling or fresh berries. Try adding lemon zest to the cheesecake batter for a great combo with blueberries.
Raspberries – Canned raspberry pie filling or fresh raspberries
Powdered sugar – Just a dusting of powdered sugar goes great with mini cheesecakes, especially if you’re unsure what kind of topping you’d like. Powdered sugar won’t overpower any of the flavors.
Lemon curd – Store-bought lemon curd goes great with these mini cheesecakes. Try adding the zest of 1 lemon into the cheesecake batter for additional lemony goodness.
Peach pie filling – Another summery idea.
STORAGE AND MAKE-AHEAD

Cheesecakes will keep in an air-tight container in the refrigerator for up to 5 days. They’re okay to eat when they come out of the oven, but they are much firmer and the flavors are better after chilling for at least a couple of hours.
If possible, make these mini cheesecakes the day before serving and let them chill in the refrigerator for 8-24 hours. You can flash freeze mini cheesecakes for easier planning.
Place mini cheesecakes (without topping) on a baking sheet and freeze for 2 hours. Transfer mini cheesecakes into a large zip-top freezer bag and store in the freezer for up to 2 months.
Thaw cheesecakes overnight in the refrigerator and add topping right before serving. If possible, store fruit toppings separately.
After a few days, cheesecakes are still perfectly safe to eat, but the cheesecakes will be best if you’ve stored the fruit toppings separately, as otherwise toppings can get a bit watery. Cheesecakes travel well, so just leave mini cheesecakes in the liners and place in a container that closes securely in one layer.
Keep them cold and add the toppings when you arrive.
FREQUENTLY ASKED QUESTIONS
WHY DID MY CHEESECAKES CRACK ON TOP?
There are a couple of reasons. Over-mixing the cheesecake batter, especially after you add the eggs, incorporates too much air.
As the cheesecakes bake, the air expands and causes cracks. As they cool, the cracks get worse because the cheesecakes shrink into the air bubbles.
Cheesecakes can also crack if your oven is running too hot. However, minor cracks are unavoidable.
Don’t fret, they won’t affect the taste and will be covered by toppings anyway. To minimize cracking, make sure you’re not over-mixing the batter, especially after you add the eggs.
Also, make sure your oven is the correct temp.
CAN I USE LOW-FAT CREAM CHEESE?
You can but the texture will be softer and looser. Low-fat cream cheese has a higher water content which affects the texture of the filling.
It won’t be as firm. These minis won’t hold together as well and may not be as satisfying to eat, but will still taste really good.
I recommend full-fat brick cream cheese to achieve the perfect mini cheesecake bite.
CAN I SUBSTITUTE THE VANILLA WAFERS?
Yes, feel free to substitute with an equal number of vanilla or chocolate sandwich cookies, with filling removed, or vanilla wafers. Even trimmed down graham or shortbread cracker cookies will work.
Just make sure whatever crust you choose is sturdy enough to hold its own and lay flat in the muffin liner.
HOW DO I KNOW WHEN THEY’RE DONE BAKING?
Bake at 350 for 20-22 minutes, checking at 20. They will be golden brown around the edges, the tops will still jiggle a bit but will firm up as they cool.
The heat of the muffin cups will continue to cook the centers. If they’re firm to the center when you take them out of the oven, chances are they’ve over-baked and will be a bit dry.
CAN I MAKE THESE WITHOUT A MIXER?
If for some reason your cream cheese wasn’t allowed to soften enough it will be very difficult to mix. If it sat out over two hours it will be pretty soft.
You CAN mix by hand, but it will take a lot of muscle and may be a little lumpy. However, if the cheese is not soft it will be nearly impossible to mix it smooth.
Don’t even try, you’ll be discouraged when you realize that the lumps won’t mix out, melt, or bake out!
CAN I ADD FLAVORINGS TO THE BATTER?

The batter is pretty mild so you can add a variety of things to it. Here are a few ideas:
Lemon zest (from 1 whole lemon) – Add at the same time you add the vanilla.
Almond extract – Add about half of what you would typically add as almond extract is much stronger than vanilla. Great with a cherry topping.
Chocolate – Add 1T cocoa powder. Add at the same time you add the sugar.
Just a heads up, avoid adding too much liquid (think lemon juice) to the mixture. You want the batter to be able to set.
WHAT PAN DO YOU BAKE THESE IN?
I used a regular 12-cup nonstick muffin pan and liners. Darker muffin pans may result in slightly darker bottoms.
WHAT SCOOP DID YOU USE?
I used a medium cookie scoop which makes the process quicker and ensures all of the mini cheesecakes are the same size so they bake evenly.
Party Cheesecakes
Ingredients
- 2 packages cream cheese 8 ounces each, softened
- 1 cup granulated sugar
- 1 teaspoon vanilla extract
- 2 eggs
- Vanilla wafers
- Pie filling or fruit topping optional
Instructions
- Preheat oven to 350°F and line muffin tins with paper liners.
- Place one vanilla wafer flat-side down in each liner.
- Beat softened cream cheese until smooth and fluffy.
- Add sugar and vanilla and beat until combined.
- Add eggs one at a time, mixing just until incorporated.
- Spoon filling over vanilla wafers, filling cups about three-quarters full.
- Bake until set, about 15 to 20 minutes.
- Cool completely, then refrigerate until chilled.
- Top with pie filling or fruit before serving if desired.