No Bake Desserts: Pumpkin Pie No Bake Dessert Recipe
When October arrives and the temperatures start to cool, pumpkin spice season begins. Not everyone loves the season, but I certainly do. But making a homemade pumpkin pie can be a lot of work. First you must make or buy a pie crust, and then make the filling, which requires a lot of ingredients and, of course, the oven! Not to mention you probably don’t want to do all that work if it’s just for a weeknight dessert or a friend’s gathering. This pumpkin pie dessert is a dessert that requires no oven and still gives you all the flavors of a classic creamy, spiced pumpkin pie! It also won’t go bad in a week because it keeps well, plus it won’t fall apart because it’s set up in the fridge and slices cleanly. In my opinion, it’s the best of the no bake desserts, if not the only, that won’t taste like pure disappointment!
Why This Pumpkin Pie No Bake Recipe Works
Many no bake pumpkin desserts have fillings that are too soft, too sweet, or odd and gummy. However, this recipe avoids all of that thanks to a few specific things in the recipe.
To start, the filling uses cream cheese instead of just whipped topping. The cream cheese gives the mixture some structure, and the tangy flavor helps to balance out the sweetness of the sugar and pumpkin. Other than that, you’d just be left with some foam filling instead of cream pie filling.
In this case, using canned pumpkin as opposed to pumpkin pie filling is the better choice. Filling for pumpkin pies is premade with sugar and spices, meaning you will lose control of the flavor balance of your food. With plain canned pumpkin, you have total control over how sweet and spiced you want your food to be.
Third, time in the refrigerator does the work of the oven. It is best to let it chill overnight, but two to three hours minimum is also fine. Chilling is one of the most neglected, yet most important, steps when making a cheesecake. Without it, the filling will slide as you cut the cheesecake. It may take a while, but the end result is clean slices.
As the graham cracker crust is pressed and not baked, it keeps a good and slightly crumbly texture. It has enough butter to hold together when chilled but doesn’t turn into a hard brick the way crusts that have been baked do.
What You Need to Know Before You Start
A couple things to keep in mind before you start mixing:
Temperature is key when working with cream cheese. For best results, use cream cheese that is at room temperature. If cream cheese is cold, beating it to a smooth and lump-free consistency will be impossible. Lumps will remain no matter how long you stir the mixture. You should remove the cream cheese from the fridge about 45 minutes to one hour before you start your cooking project.
Here you will find the most stable canned pumpkins. Libby is the most stable stock brand. Some discount and store brands have been wetter, which can make the filling looser. If yours looks very wet, blot the mixture with a paper towel, coax.
You should pack the crusts tightly. One good way to do that is to use the flat end of a measuring cup or a drinking glass to really press the crust down. If the crust is pressed down too loose, it will crumble when serving. This is the one step where more pressure is actually helpful.
Cool Whip vs. fresh whipped cream Whipped topping, like Cool Whip, keeps its shape for days in the fridge. Fresh whipped cream has a better taste, but weeps in ~24 hours. This makes Cool Whip a practical choice if you are prep-ing for a dessert event or serving dessert over a number of days. For same day serving of desserts, fresh whipped cream is the better choice.
As part of the design for this recipe, this is a make-ahead dessert. The dessert will need a minimum of 2 hours refrigeration time and will set better if left overnight. Keep the overnight refrigeration time in mind as this dessert is not a last minute buy.
Ingredients
For the Graham Cracker Crust
- 1 1/2 cups graham cracker crumbs (about 12 full crackers)
- 1/3 cup granulated sugar
- 6 tablespoons unsalted butter, melted
For the Pumpkin Filling
- 8 oz cream cheese, softened to room temperature
- 1 cup canned pumpkin puree (not pumpkin pie filling)
- 1 cup powdered sugar
- 1 teaspoon pumpkin pie spice
- 1/2 teaspoon ground cinnamon
- 1/4 teaspoon ground nutmeg
- 1 teaspoon vanilla extract
- 8 oz whipped topping (Cool Whip), thawed
For Topping (Optional)
- Additional whipped topping
- A light dusting of ground cinnamon or pumpkin pie spice
- Crushed graham crackers
Equipment You’ll Need
You don’t need anything fancy, but having the right equipment makes the process easier. This recipe is best with a standard 9-inch pie dish* as deeper dishes will give you a thinner layer of filling, and shallower dishes may overflow. *These are my personal recommendations*. I prefer using a glass pie dish as I like to see the crust layer from the side.
Perhaps one of the most handy tools to use here is a hand mixer. It only takes about two minutes to beat the cream cheese so that it is smooth, and it incorporates everything evenly. Sure, you could do it by hand, but it would take a lot of elbow grease, and that would probably mean that your filling would still have some lumps. When it comes to a dessert that tastes as good as it looks, it is worth a few minutes of cleanup to use a hand mixer.
- 9-inch glass pie dish — lets you see the crust from the side; glass holds temperature well when chilling
- Electric hand mixer — essential for getting the cream cheese filling completely smooth without lumps
- Mixing bowls with lids — useful for both mixing and covering the pie while it chills without the plastic wrap slipping
- Pie carrier with lid — if you’re bringing this to a potluck or holiday dinner, a pie carrier protects the top and makes transport easy
How to Make Pumpkin Pie No Bake Dessert
Step 1: Make the Graham Cracker Crust
Grab a medium-sized bowl to mix together the granulated sugar and graham cracker crumbs. Add in the butter you’ve melted and stir until the mixture looks like wet sand and the crumbs are all coated. When you press the mixture between your fingers, it should stick together. If the mixture is still crumbly and dry, add another teaspoon of melted butter.
Pour the crumb mixture into your pie dish. Use your fingers to even it out on the bottom and the sides. Then for the bottom side of a measuring cup (or any smooth bottomed drinking cup) to flatten it and make it even. Be sure to press on the edges where the bottom of the dish meets the sides of the dish because this is where the crust tends to break apart first.
While making the filling, hold the crust in the refrigerator. It will help it firm up for about 15 minutes, so it will hold shape once it is filled.
Step 2: Beat the Cream Cheese
Place the softened cream cheese into a big mixing bowl. Use a hand mixer, and mix until it is completely smooth, without any lumps or bits. This process takes about 2 minutes. A few chunks may appear in the mixture. This can happen the cream cheese may be too cold. If this is the case, you should stop mixing and let it sit for 15 minutes before you try to mix it again.
This step is crucial as it sets the tone for the texture of the entire filling. After all, if your base is lumpy, so will be your finished filling.
Step 3: Add the Pumpkin and Spices
Combine the cream cheese with the pumpkin puree in a separate bowl and mix on low speed until combined. Next, pour in the powdered sugar, pumpkin pie spice, and a dash each of cinnamon, nutmeg, and vanilla extract. Blend on medium until the filling is smooth and uniform in color, approximately 1 to 2 minutes.
Now is the time to taste the filling. This is your one opportunity to make any adjustments. Would you prefer it to be slightly spicier? If so, you should add an additional 1/4 teaspoon of pumpkin pie spice. Is it too sweet? Adding a small pinch of salt (1/8 teaspoon) will counteract that, and will make basically no difference to the flavor profile.
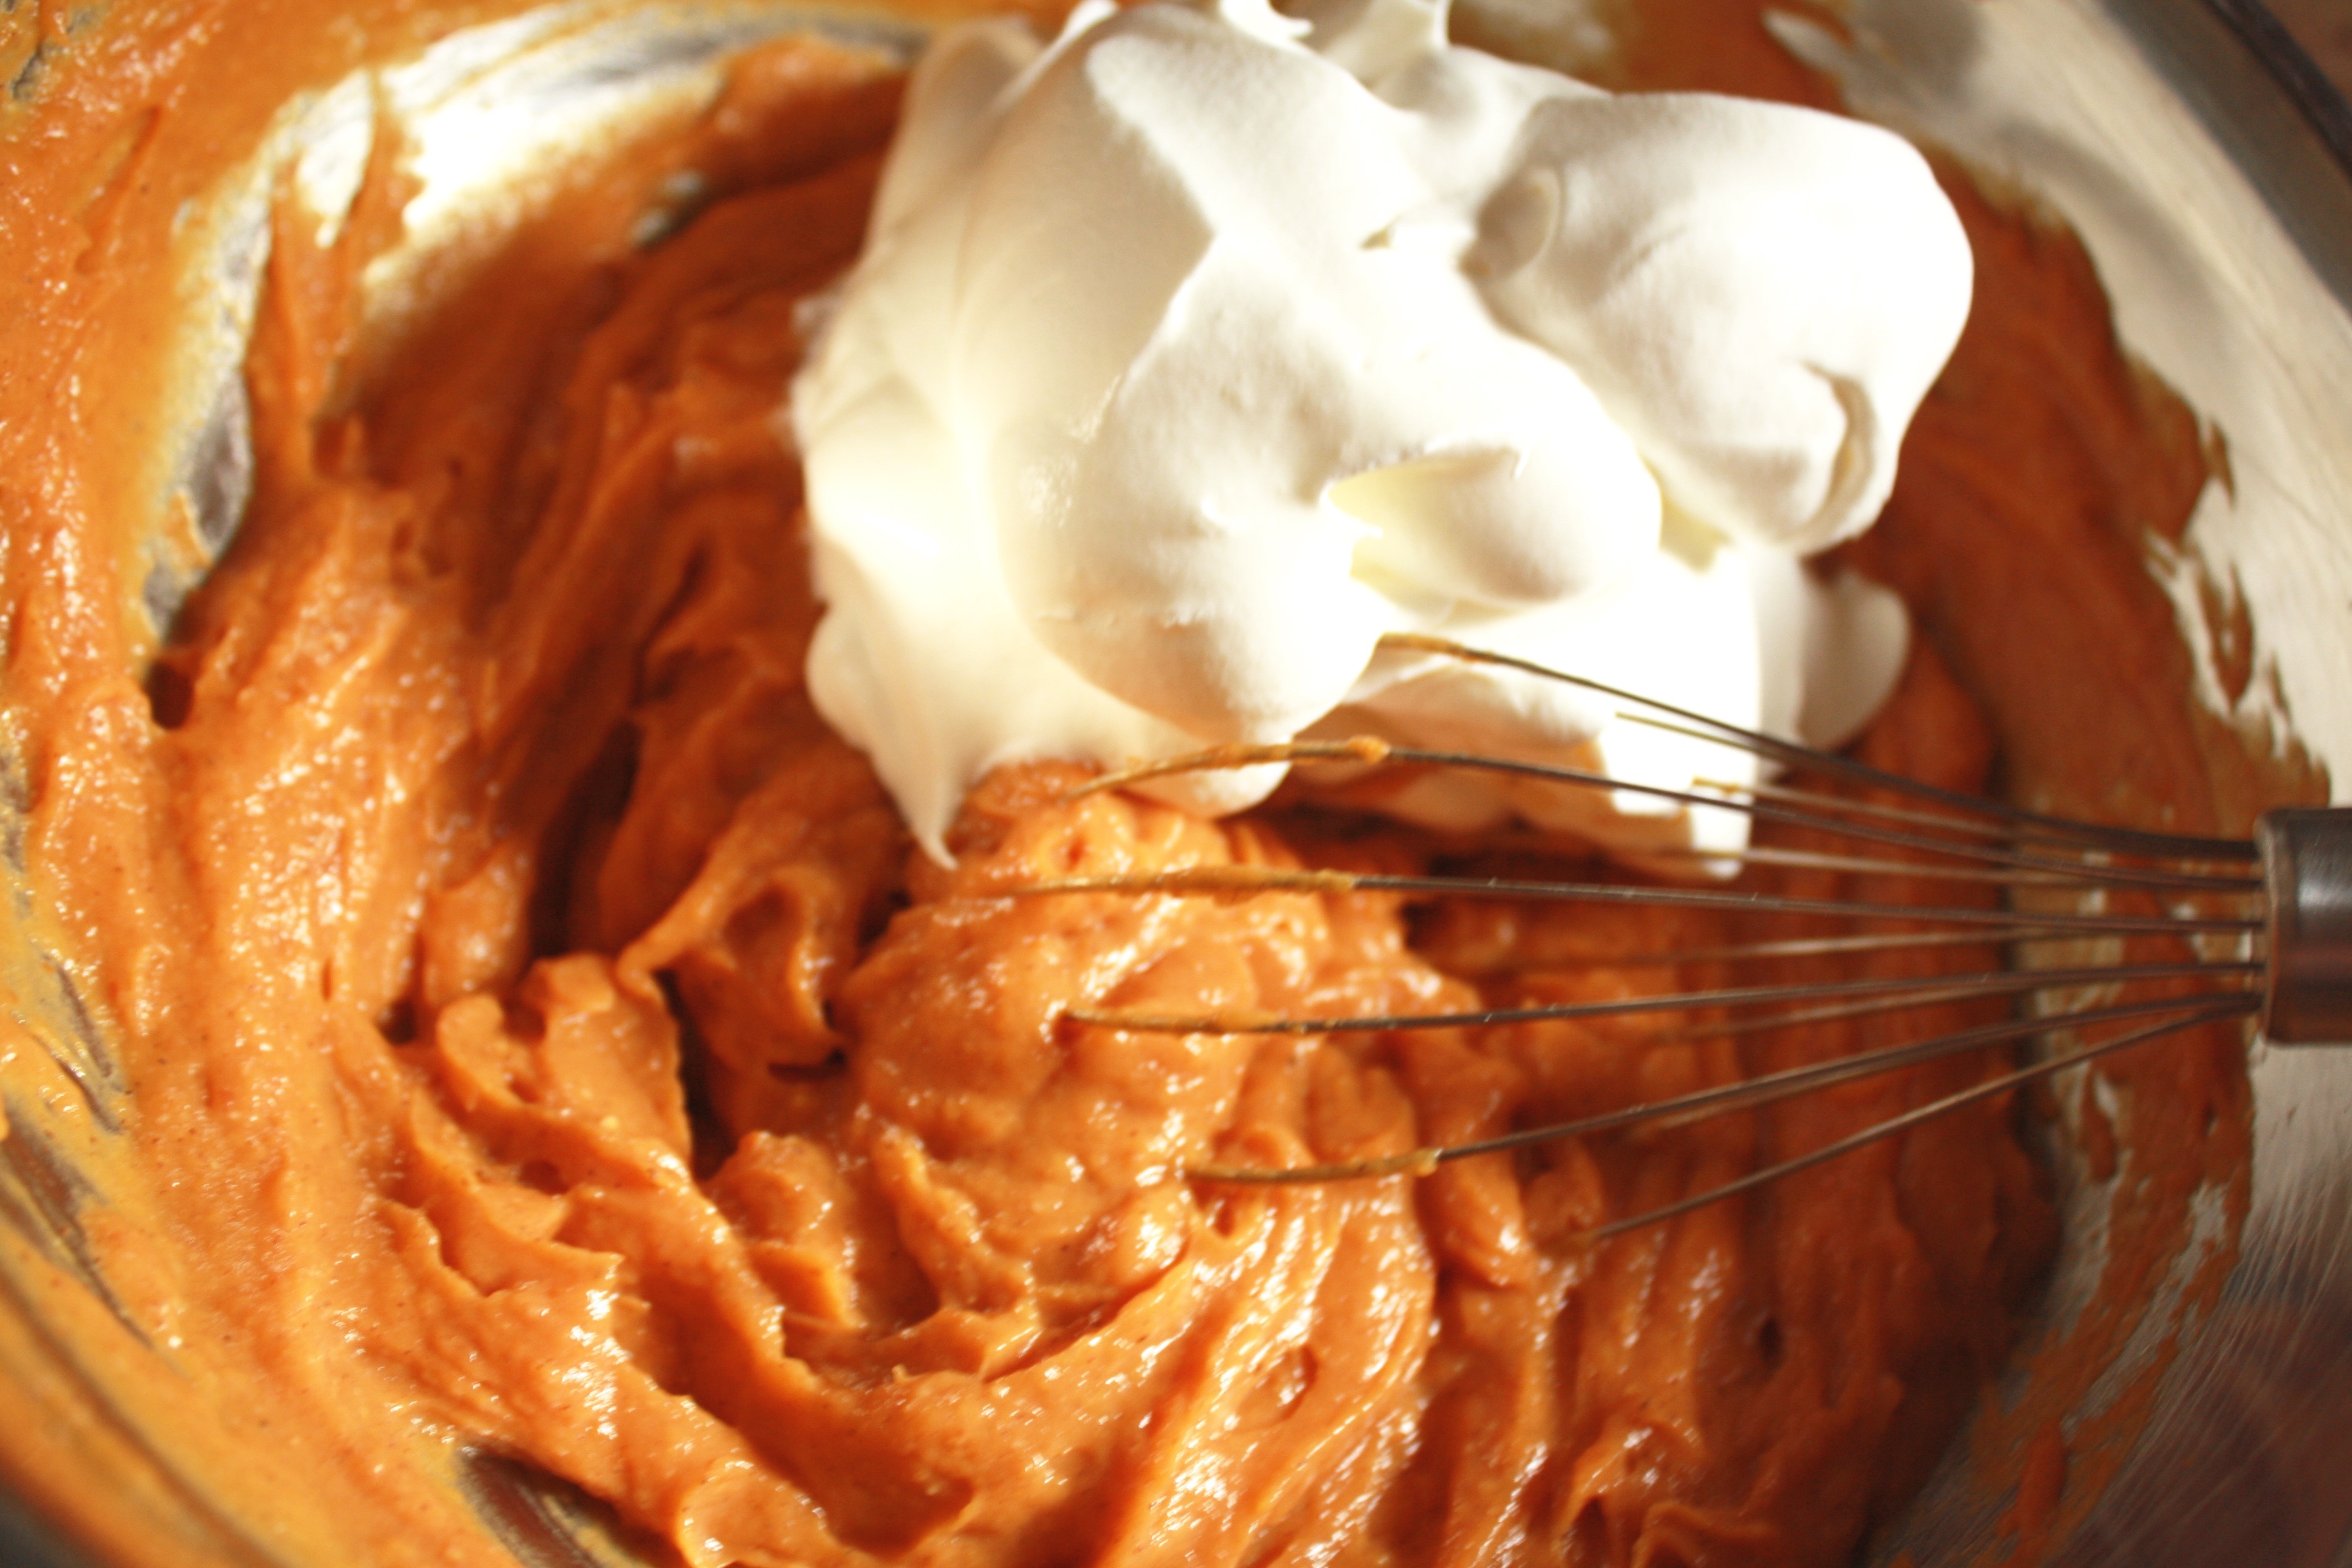
Step 4: Fold in the Whipped Topping
Use a rubber spatula instead of a mixer. Add the frozen Cool Whip to the pumpkin filling. Fold it in lightly by taking wide strokes from the bottom up and crossing over the top. You should not stir it or beat it in. Agitation sacrifices the whipped topping’s lightness and causes the filling to be denser.
Fold until just mixed. Some light orange streaks are fine. Overmixing issue at this stage is more of a problem than undermixing.
Step 5: Fill and Chill
Take the chilled crust out from the fridge. Pour the pumpkin filling into the crust and spread it out using a spatula. Loosely cover the pie with some plastic wrap or a pie cover making sure it does not touch the surface of the filling. Then refrigerate the pie for **at least** 2 hours, 4 hours, and overnight is best.
The filling will firm up quite a bit as it chills. A pie that looks a bit jiggly after two hours will be completely set after four. If you are planning to serve this for a holiday dinner, we recommend making it the night before.
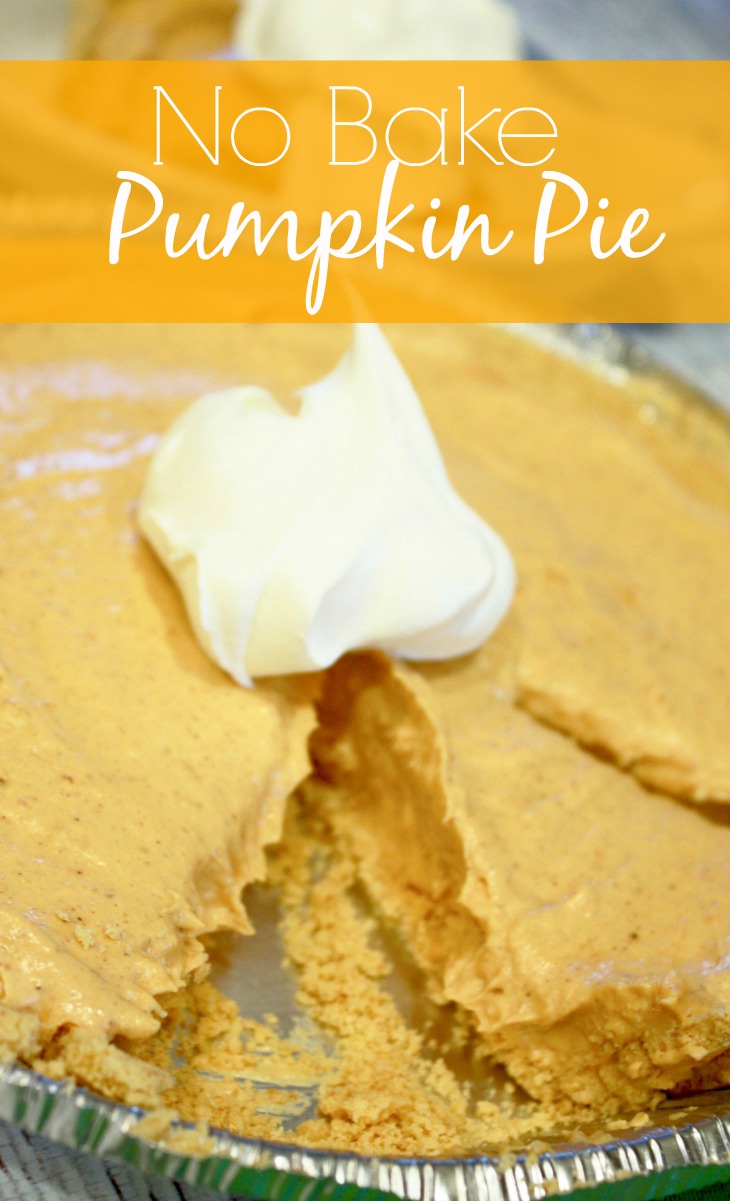
Step 6: Top and Serve
If using, add your toppings just before serving. A nice, clean look is achieved by putting a dollop of whipped topping on each slice. In seconds, a quick sprinkle of cinnamon or pumpkin pie spice transforms your pie into a bakery-quality dessert. For the neatest pie slices, use a clean, sharp knife and wipe it after every cut.
Tips for the Best Results
On the Crust
Buying a graham cracker crust that is made and ready for you will save about 5 minutes when making a dessert, but a homemade crust will stand up better because you determine how much butter to use. Crusts that you buy tend to be more shallower, which means you run the risk of having extra filling. If you happen to have leftover filling because you used a store-bought crust, you can store it in a small ramekin in the fridge — it is delicious as a dip for apple slices.
You can also use gingersnap crumbs, instead of graham crackers, using the same ratio- 1 1/2 cups gingersnap crumbs, 1/3 cup sugar, 6 tablespoons butter. The ginger provides a nice bite which compliments the pumpkin spice.
On the Filling
Powdered sugar dissolves fully into cream cheese with no grittiness, which is why it is used instead of granulated. Do NOT substitute with granulated sugar — the texture will be glaringly grainy, especially when the pie is chilled.
To achieve a denser, richer filling, cut the whipped topping down to 6 oz instead of 8. If you want it to be a little lighter and fluffier, go for the 8 oz. Both options are fine — it’s purely a matter of preference.
On Serving
This pie is easiest to slice when it’s super cold- as in, straight out of the fridge cold. It shouldn’t be sitting out on the counter to warm up. If you’re bringing the pie somewhere, keep it cold while traveling. The warm filling will make the pie slide off the crust.
A thin spatula or pie server will work better than a wide one. This helps keep the crust from crumbling. Simply slide it under the crust and lift it clean instead of scooping.
Storage Instructions
It is practical because this no-bake pumpkin dessert stores better than a baked pie.
Refrigerator: You can store it for up to five days to let it cool in the fridge. Keep it wrapped tightly. The moisture from the filling will absorb into the crust, making it soften slightly. Crust will be noticeably softer by day 3 or 4 which is preferred by people The filling is good throughout.
Freezer: This pie is great to freeze. To protect the crust, wrap in plastic wrap, then wrap in foil, or use a pie carrier. It can be frozen for one month. You can thaw in the refrigerator overnight. Do not thaw at room temperature. This causes the filling to become watery. The pie will keep its texture after freezing, although the crust will become compact. It will still taste good.
Personal slices: For simple grab-and-go servings, slice prior to freezing. Plastic wrap should be used to cover each slice. In the refrigerator, they take around 3 to 4 hours to thaw.
If you’re considering freezing the pie, leave off the whipped topping. Whipped topping that is frozen and then thawed becomes watery. Add the topping after thawing the pie.
Variations Worth Trying
Chocolate Graham Cracker Crust
To make the crust, you can use crushed chocolate graham crackers or Oreo crumbs (with the filling removed). If you want a less traditional version of this recipe, the chocolate and pumpkin mix here is especially good.
Individual Cups
For each individual Mason jar or dessert cup, press the crust into the bottom, and then layer the filling on top. This way, there’s no slicing involved, and they’re easy to serve at parties or pack for lunches. Use about 2 tablespoons of crust per jar, and then top with 1/3 cup of filling.
Maple Pumpkin Version
Swap 1/4 cup of the powdered sugar for 2 tablespoons of real maple syrup. It provides an extra hint of flavor which is great for fall. If possible, use grade B maple syrup as it has a stronger flavor.
Cream Cheese-Free Version
If you need a lighter option, consider swapping the cream cheese for the same amount of Greek yogurt (full-fat Greek yogurt yields the best results). While the taste will be a little different and the yogurt version won’t slice as cleanly, it can still work for Greek yogurt dairy sensitivities.
Frequently Asked Questions
Can I use pumpkin pie filling instead of plain pumpkin puree?
It is possible, but the end result will be overly sweet and spiced, plus you would be losing control over the balance of flavors. If using pumpkin pie filling, adjust the powdered sugar to 1/2 cup and do not add any of the spices — you can taste and adjust after this. The filling may not be as smooth, because pie filling can have a slightly different consistency compared to regular puree.
Why is my filling not setting up?
The most likely cause is not enough chill time. A minimum of two hours is possible, but four hours is more reliable. Another possibility is that the cream cheese was mixed in too warm, which can cause the filling to be more loose. Watery canned pumpkins can also cause the filling to not firm up properly. If you have pureed pumpkin that has excess liquid, it can also be the cause. Before concluding there is a problem, give it more time in the fridge.
Can I make this a day ahead?
Absolutely, the taste and texture will improve when the dessert is prepared the day before since the filling will have set and the individual components will have melded together. When it comes time to prepare your dessert, put any toppings on it the day you’re going to be serving it, not the day before. This is one of the best recipes to prepare ahead of time as it reduces the work you’re required to do on the day itself, and there’s no loss in quality.
Can I use a pre-made graham cracker crust from the store?
A premade 9 inch graham cracker crust is also fine and saves you a few minutes. They are not as deep though, so you may not fit all the filling – just put the extra in ramekins. Homemade crusts also hold together much better because of the higher butter content, but it is a reasonable trade-off for using a premade crust.
Can I freeze the whole pie?
Of course! For up to a month, wrap it up well (plastic wrap, then foil) and freeze. To stay thawing, it will sit in the fridge overnight. Whipped topping should not be frozen, so add it fresh after thawing. The crust, slightly more compact than when it was first made, is the only exception. Everything else is nearly fresh!
What can I use instead of Cool Whip?
Fresh whipped cream tastes better, but unlike cool whip, it will start to weep after a day in the fridge. For 8 ounces of cool whip, use 1 1/2 cups of heavy whipping cream that’s been whipped to stiff peaks. If you are planning to serve the pie on the same day, fresh whipped cream is the best option. But if you are going to have the pie made ahead of time or if it will be kept for several days, then cool whip is the better option.
How do I get clean slices?
Here are a few tips that can help you slice your pie: 1. Ensure that your pie is fully chilled. It may be helpful to slice your pie inside the fridge. 2. Use a sharp knife. 3. Clean your knife using a damp cloth after each cut. If you do not clean your knife, the filling will stick to the blade, which will drag the blade on the next cut. A gentle and flexible spatula can help you remove slices without damaging the crust.
Pumpkin Pie No Bake Dessert Recipe
More No Bake Desserts You’ll Want to Try
You should bookmark these if this pumpkin pie no bake dessert is a hit. No bake desserts are really handy when the oven is already in use for the main dish or when you need a dessert that can be made in advance, like two days in advance, without losing any quality.
- No Bake Cheesecake — The same cream cheese and whipped topping base, without the pumpkin. Endlessly customizable with different toppings: strawberry, blueberry, caramel, or plain.
- No Bake Chocolate Peanut Butter Bars — An oat-and-peanut-butter base pressed into a pan, topped with a chocolate layer. Sets in the freezer and cuts into bars. A crowd favorite at bake sales.
- Pumpkin Cream Cheese Dip — A simplified version of this filling without the crust. Serve it with graham crackers, apple slices, or vanilla wafers. Ready in 10 minutes, no chilling required.
- No Bake Pumpkin Balls — The filling rolled into bite-sized pieces and coated in crushed graham crackers or powdered sugar. Good for parties where slicing and plating isn’t practical.
You dont need to spend a ton of time in the kitchen to make a great fall dessert. For example, this no-bake pumpkin pie takes under 20 minutes of prep time! Just let the fridge do the rest!
No Bake Pumpkin Pie Dessert
Ingredients
- Graham cracker crumbs
- Melted butter
- Sugar divided
- Cream cheese softened
- Canned pumpkin puree
- Pumpkin pie spice
- Vanilla extract
- Cool Whip or whipped topping
- Extra whipped topping for serving
Instructions
- Mix graham cracker crumbs, melted butter, and some sugar until evenly moistened.
- Press the crust firmly into a pie plate.
- Beat softened cream cheese until smooth.
- Add pumpkin puree, sugar, pumpkin pie spice, and vanilla. Mix until smooth.
- Fold in Cool Whip gently until combined.
- Spread filling into the prepared crust.
- Cover and refrigerate at least 2 to 3 hours, preferably overnight.
- Top with whipped topping before serving if desired.