
Oreo Truffles Dessert Recipe: Oreo Balls
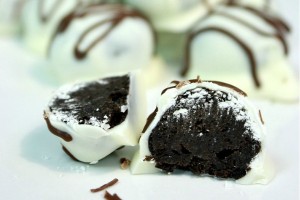
Only 3 simple ingredients and no baking involved! These Oreo truffles are one of my go to dessert options for parties, and every time I bring them, I’m always asked where I bought them from! These are as good as they sound and they are super simple to make! Crushed Oreos and cream cheese rolled into balls and dipped in chocolate. Couldn’t be funner to make!
The first time I made them I was obviously skeptical, they seemed too flowery to be too simple. But once you actually do it, you begin to question why it took you so long. Probably the hardest part is waiting for them to set in the freezer before you dip them, and then not eating half the mixture off the spoon.
What Makes This One a Keeper
- Only three real ingredients — Oreos, cream cheese, chocolate. No obscure items, no specialty pantry staples.
- No baking required — The oven never turns on. Great for summer, for holidays when the oven is already full, or just for when you don’t want to deal with baked goods.
- The texture is genuinely good — The inside stays slightly fudgy and dense, not dry or crumbly. The chocolate coating gives you that satisfying snap when you bite in.
- Make-ahead friendly — These actually get better after sitting in the fridge overnight. The flavors meld and the texture firms up nicely.
- Infinitely customizable — Swap the Oreo flavor, swap the chocolate color, drizzle a contrasting color on top. The base recipe stays the same.
- They look like they came from a bakery — That’s not an exaggeration. People consistently assume these were purchased somewhere.
What to Know Before You Start
Here are a couple tips that will save you time and frustration before you get started:
Only use regular Oreos; do not use Double Stuf. This is a non-negotiable rule. Using Double Stuf Oreos will throw off the cookie to cream ratio. The cookie balls will get too soft and sticky and won’t hold their shape. The flavor will be too sweet and too greasy. Please do not deviate from original Oreos.
Let your cream cheese soften. If the cream cheese is cold, it will not mix well into the Oreo crumbs. You will end up with lumps. Take it out of the fridge at least 30–45 minutes before you start, or let it sit out on the counter while you crush the cookies.
The freezing step is essential. It allows the dipping process to be much easier. If the dough balls are too warm when you dip them in the chocolate, they will break apart. So, you shouldn’t skip or rush it.
Dip your treats in small batches. Only take 6-8 from the freezer at a time. They will get warm, and start to soften, making them tricky to work with, so keep the rest cold.
When considering the timing for this task, you should plan for it to take an hour. The time includes: 15 minutes to complete the mixture, 15 minutes to let it cool in the fridge, 20 minutes to let it cool in the freezer, and an additional 10-15 minutes to dip and allow the mixture to set. The majority of this time is waiting and is mostly hands-off.
Ingredients You’ll Need
While the recipe card below contains the specific amounts of each ingredient, here is some background information about the ingredients:
Oreo Cookies (one 15 oz. package)
The entire package goes in, including the cream filling. Do not separate the cookies from the cream filling. The cream cheese along with the filling is what binds it all together. Use the regular size package and the regular flavor. If that is all you have, the generic brand chocolate sandwich cookies will suffice.
Cream Cheese (one 8 oz. block)
What you want is full fat block cream cheese. Not the whipped type that’s in a tub. That one has more air and moisture whipped into it which will make your mixture too watery. Philadelphia is the standard and it works great. Generic full fat block cream cheese is fine too.
Almond Bark or Chocolate for Dipping
Almond bark, whether white or chocolate, is an easy choice as it melts and sets quickly and you don’t have to temper it like you do with real chocolate. You can find it in the baking section near the chocolate chips. An entire package (typically 24 oz.) gives you enough to dip comfortably without running out.
Melting wafers like Ghirardelli and Wilton Candy Melts could be used for more variety in colors. Real chocolate could be used as well but takes a little more time to get the chocolate to melt evenly without clumping. Almond bark could be an easier option for a first time melting chocolate.
Equipment That Makes This Easier
You can make these without specialized tools, but a few items do help to make the process easier:
Using a food processor makes it super easy to get the Oreos evenly crumbled in record time. If you don’t have a food processor, you can put the Oreos in a large zip-top bag, but then you’ll have to put in a lot more effort to get the cookies crumbled and you bag end up with uneven and chunky pieces. Not every food processor has to break the bank. This one is a good option if you are looking for something more compact.
Chocolate dipping forks or dipping tools make the process much cleaner. While a regular dinner fork can work in a pinch, the tines catch and chocolate builds up on them, leaving one side of your truffle uncoated. You can get a proper dipping tool set for under $10 and it makes a difference.
Your dipped truffles will setup on a jelly roll pan that has been lined with parchment paper. The paper makes cleanup easier and keeps the truffles from sticking. It is also fine to use a normal baking sheet.
How to Make Oreo Truffles
Step 1: Crush the Oreos
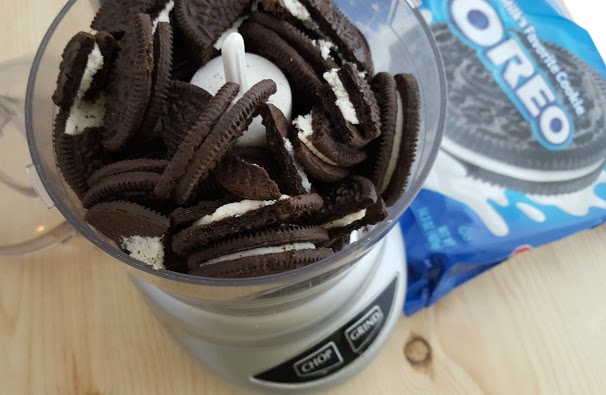
Place the entire package of Oreos in your food processor, and pulse until you achieve a fine, and even crumb consistency. Think of the consistency as wet sand– you don’t want any large chunks remaining. If using the bag and rolling pin method, seal the bag, lay it flat and tap over the top. You want the consistency to be a fine crumb, so make sure there are no large pieces remaining.
Before you dump all the crumbs out, reserve about 2 tablespoons in a small bowl to sprinkle on top of the finished truffles for decoration.
Step 2: Mix in the Cream Cheese
Place the Oreo crumbs into the mixing bowl. Add your softened cream cheese and mix until evenly distributed. While a hand mixer is the fastest option, a strong spoon (once again, patience) will also do just fine. The mixture should appear uniform. Do not mix until there are no visible streaks of the cream cheese. The density is intentional. Embrace the stickiness.
Step 3: Chill the Mixture
To make your mixture less sticky, cover the bowl and chill in the refrigerator for 10-15 minutes. Be careful not to exceed 15 minutes, or else you lose pliability, and the mixture won’t be able to be easily shaped.
Step 4: Roll into Balls
Use a spoon to scoop out some of the mixture and roll it into a ball. I try to get it to be about the size of a dime, but maybe a little bigger. Since the chocolate coating is going to add some size, try to make it a little smaller than what you would think. If they are too big, one ball will turn into 2 or 3 bites, and that is pretty awkward.
As you roll the balls, you should place them on a baking sheet lined with parchment paper. After you have rolled all the balls, put the baking sheet in the freezer for about twenty minutes. They need to be firm first for these to make the dipping process easier.

Step 5: Melt the Chocolate
Melt your almond bark or melting chocolate using a double boiler or in the microwave in 30-second intervals, stirring in between each interval. Since chocolate can seize if it overheats, be careful not to overheat it. Wheeling chocolate will be smooth and will not be chunky. It will be warm enough to not be difficult to dip.
When using a double boiler, keep the heat at medium-low and stir often. In the microwave, for a full package of almond bark, 3-4 intervals of 30 seconds should be enough.
Step 6: Dip the Truffles
Take 6 to 8 balls from the freezer at a time. With your dipping fork (or regular fork if that’s what you have), sink each ball into the chocolate and cover it completely. Lift the ball out and allow it to drip excess chocolate. Place the chocolate-covered ball on the parchment-lined pan. Move fast. The balls will begin to warm up quickly.
Place each dipped truffle down carefully. If you want to sprinkle the Oreo crumbs on top, do that right away while the chocolate is still wet. It sets quickly!
Step 7: Set and Serve
As soon as you dip all the truffles, place the pan in the refrigerator to chill for 10 minutes; this allows the chocolate to harden completely. If you are doing chocolate drizzle as decoration, allow the base coat to set first, then melt a little bit of a different type of chocolate, pour it into a sandwich bag, cut off a tiny little corner, and drizzle it on top. Before moving them, let the drizzle set.
Helpful Tips
Common Mistakes to Avoid
- Using Double Stuf Oreos — The ratio is off and the balls won’t hold their shape. Use original.
- Cold cream cheese — You’ll get lumps and an uneven texture. Soften it first.
- Skipping the freeze — Warm balls fall apart in the chocolate. The 20-minute freeze is not optional.
- Overheating the chocolate — It thickens, clumps, and won’t coat smoothly. Low and slow.
- Making the balls too big — They become harder to eat in one bite and the ratio of coating to filling gets off. Keep them smaller than you think.
- Cutting the corner of the drizzle bag too large — Start with a very small snip. You can always cut a little more, but you can’t undo a hole that’s too big. The chocolate will go everywhere.
Upgrades Worth Trying
- Flavor the dipping chocolate — Add a drop of peppermint extract or orange extract to the melted chocolate before dipping for a different flavor profile.
- Use flavored Oreos — Mint Oreos dipped in white chocolate are a great holiday variation. Birthday Cake Oreos work well too. The base recipe stays identical.
- Add a pinch of flaky salt on top — The salt-chocolate-cookie combination is genuinely good. Add it right after dipping before the chocolate sets.
- Tint white chocolate with food coloring — Use oil-based food coloring (not water-based, which will seize the chocolate) to color white almond bark for holiday themes or party colors.
Variations and Substitutions
Peppermint Oreo Truffles
Take Peppermint Oreos (these are only available during the holiday season so get them while you can) and dip them into some melted white chocolate. You can also crush candy canes and sprinkle some on top while the chocolate is still wet. These are perfect for Christmas cookie exchanges because they look super festive and the combination of peppermint and white chocolate is timeless!
Golden Oreo Truffles
Replace the normal Oreos with the Golden Oreos and dip into the white chocolate instead. This makes the treat taste a little more like a cheesecake truffle since it has a little less chocolate and a little more vanilla. If you are preparing a variety plate, it is a nice contrast to the regular chocolate version.
Double Chocolate Oreo Truffles
For a more mature taste experience versus using milk chocolate or white almond coating, try using dark chocolate instead. The bitterness of the cracker covered with dark chocolate will clash in a more sophisticated way with the layers of cream filling in the center. Ideal if these are for adults who prefer a less sweet offering.
Serving Ideas
Oreo truffles don’t need a side dish or a sauce, but here are a couple of ideas on how to garnishthem, or how to serve them:
- On a dessert board — Arrange them alongside other bite-sized treats: caramels, chocolate-dipped pretzels, mini brownies. The truffles anchor the board.
- In mini cupcake liners — Makes them easier to pick up at a party and looks more polished. Paper or foil liners both work.
- As a cookie exchange contribution — They package well in a small box or tin, travel fine in the refrigerator, and stand out next to traditional cookies.
- As a hostess gift — A small box of these wrapped in tissue paper looks far more thoughtful than it is time-consuming to make.
Storage, Make-Ahead, and Leftovers
Refrigerator
Store completed Oreo truffles in an airtight container in the refrigerator, where they will keep well for 2 weeks. The texture is actually at its best after they’ve sat overnight — the inside evens out and the flavors even out.
Freezer
Oreo truffles can be frozen. Spread them out on a baking sheet and freeze for about an hour or until firm. Then, move them to an airtight bag or a freezer-safe container. They will stay good for three months. To serve them, move them to the fridge the night before. Don’t leave them out to thaw because the chocolate will get sweaty.
Make-Ahead Options
The Oreo and Cream Cheese mixture can be made 2 days in advance and stored in the refrigerator. When you are ready to complete the process – roll the mixture into balls and freeze them before dipping them in chocolate. You can also roll and freeze the balls without chocolate for 1 week in advance, but remember to dip them the day before, or the day you plan on serving them.
Frequently Asked Questions
Can I use Double Stuf Oreos?
Not recommended. The higher filling to cookie ratio makes the mixture too soft and too oily. The mixture won’t hold its shape well and the taste becomes uneven. Stick to Original Oreos: the ratio is what makes the texture work.
My chocolate is getting clumpy and thick. What happened?
Some of the possible causes could be that the chocolate got too hot (when overheated, chocolate will seize), or perhaps water got in (a single drop of water will make chocolate seize). You can try adding a teaspoon of vegetable shortening or coconut oil and stirring — this will help thin it out. If the mixture is completely seized (meaning it is now grainy and stiff), you’re going to have to start over.
Can I make these without a food processor?
Of course! You can place the Oreos into a large zip-top bag, seal it, and crush them using a rolling pin. It takes a little more effort and the crumbs may not be as fine, but it will still do the job. A few larger pieces won’t ruin the truffles, it will just have a rougher texture on the inside. A food processor would be quicker and easier but it isn’t a deal breaker.
Why do my truffles fall apart when I dip them?
They weren’t frozen long enough before dipping. The balls should be firm and frozen so they stay intact when they hit the warm chocolate. Make sure you freeze them for a full 20 minutes and do small batches – only take out 6-8 at a time and keep the rest in the freezer.
Can I use chocolate chips instead of almond bark?
You can use chocolate chips, but keep in mind chocolate chips are made to keep their shape when cooked, so they do not always become fully melted. They are usually a little thicker when melted, and they do not set up as clean as milk, dark, or white chocolate. Almond bark/candy melts are made specifically for coating/dipping, so they are the easier option. If you are going to use chocolate chips, it may help to add a little bit of coconut oil or shortening to help thin it out.
How far in advance can I make these?
Oreo truffles can be stored in your fridge for up to two weeks, and if you need to keep them longer, they can be frozen for up to three months. If you’re preparing for a party, making these one or two days before is the best option since the flavor gets better over time.
Related Recipes
If you enjoyed these Oreo truffles, you might also want to try these other easy, no-bake chocolate recipes:
- Peppermint Oreo Truffles — The holiday version, with crushed candy canes and white chocolate.
- No-Bake Desserts — More recipes that skip the oven entirely.
- Chocolate Recipes — Everything chocolate on the site.
- Easy Dessert Recipes — More quick, crowd-pleasing options.
Oreo Truffles
Ingredients
- 1 package Oreo cookies about 15 ounces
- 8 ounces cream cheese softened
- Chocolate almond bark or melting chocolate for coating
Instructions
- Crush Oreo cookies into fine crumbs.
- Mix crumbs with softened cream cheese until fully combined.
- Roll mixture into small balls and place on a parchment-lined baking sheet.
- Chill until firm.
- Melt chocolate coating according to package directions.
- Dip chilled Oreo balls in chocolate and let excess drip off.
- Place dipped truffles back on parchment.
- Decorate with crumbs or sprinkles if desired.
- Chill until coating is set.