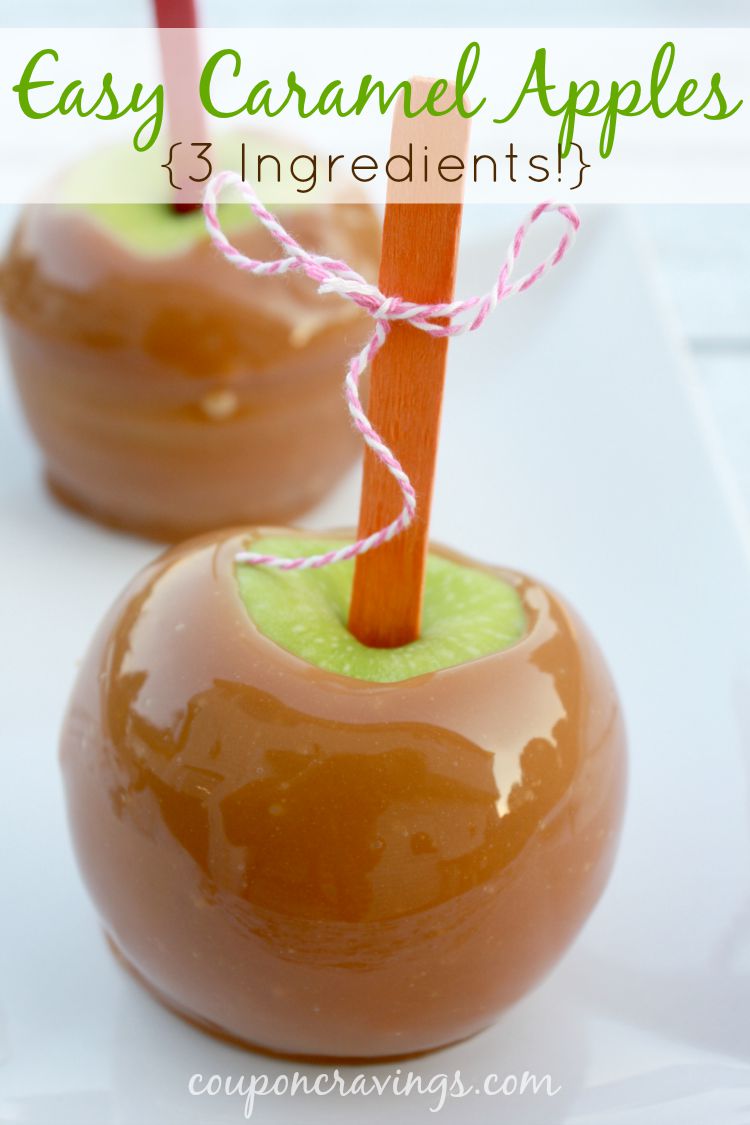
Easy Caramel Apples Recipe
Some people hesitate to make caramel apples because they seem time consuming. They’re really not! You need very few ingredients, only about three and then you need a pan. You could put some cooling on wax paper before thirty minutes are up. When I first made these I was mind blown that I had bought these from fair vendors instead of doing this myself.
For this recipe, we can use Kraft Caramel Bits, so we don’t have to unwrap a hundred caramels, and just a little splash of vanilla makes the whole thing taste as if it came from a specialty candy store. Tart Granny Smith apples work best here the contrast between the sharp apple and the sweet caramel is just what makes these so good. Let’s get into it.
What Makes This Recipe Reliable
- Caramel bits melt evenly. No hot spots, no scorching, no fighting with wrappers. The bits are sized to melt at a consistent rate over low heat.
- Vanilla does real work here. It rounds out the sweetness and adds a depth that plain melted caramel doesn’t have on its own.
- Granny Smith apples hold up. They’re firm enough that the stick doesn’t shift during dipping, and the tartness cuts the sweetness so the finished apple doesn’t taste cloying.
- The wax paper step matters. Setting the apples on buttered wax paper instead of a plate means they release cleanly — no caramel puddle stuck to whatever surface you used.
- Refrigerating to set is non-negotiable. Room temperature setting works, but it’s slow and uneven. The fridge gives you a firm, glossy coat in a fraction of the time.
What to Know Before You Start
Before you melt anything, here are a few things to keep in mind:
Dried apples are a must. This is crucial to the entire recipe. If your apple has any moisture on the outside, the caramel will slide right off. Prior to starting the recipe, wash your apples, dry them completely, and let them sit at room temperature for at least 15-20 minutes before dipping. Dried apples coat much better than cold ones, so keep that in mind. While it’s important for the apples to be at room temperature, apples that are cold from the fridge will make the caramel seize up.
Using the right size pan matters more than you may think. If the pan is wide and shallow, it can make dipping a bit awkward. You won’t be able to tilt the apple far enough to coat the sides evenly. When you use a smaller saucepan, say about 2-3 quarts, it ensures the caramel pools deep enough for you to work with. You can tilt the pan a little and spin the apple so that you coat every part without it being a struggle.
Low heat, constant stirring. Anytime you make caramel, make sure to keep an eye on it. Once the bits start melting, it takes three to five minutes before the caramel is ready. No need to walk away or rush it by turning up the heat — once caramel is burnt you won’t be able to get the bitter taste out of it.
Once it has melted, get to work, as the caramel is best to work with while it is hot. It becomes difficult to work with when it cools, so ensure to dip all the required apples while the caramel is still running. If the caramel thickens too much mid-batch, reduce the heat and stir for a few seconds to loosen the mixture.
Ingredients
You need 4 things. Here’s what each one does:
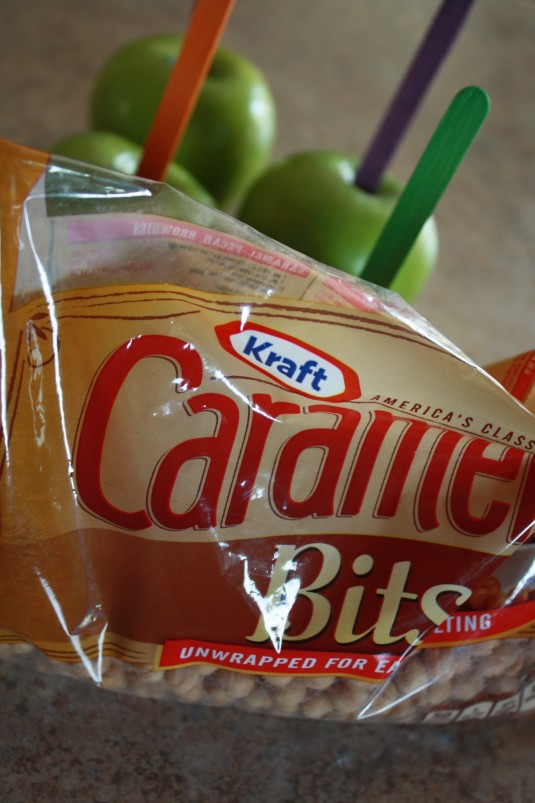
- 1 package (11 oz.) Kraft Caramel Bits — These are pre-cut caramel pieces designed for melting. They’re available near the chocolate chips at most grocery stores in fall, and increasingly year-round. You can substitute individually wrapped Kraft caramels (about 35–40 unwrapped) but the bits save time.
- 3/4 teaspoon vanilla extract — Pure vanilla, not imitation if you have it. This small amount makes a noticeable difference in flavor. Imitation vanilla works but tastes slightly artificial once you’ve had it with real extract.
- 1 tablespoon water — This is what prevents the caramel from seizing up as it melts. Don’t skip it, and don’t add more — you want the caramel thick enough to coat.
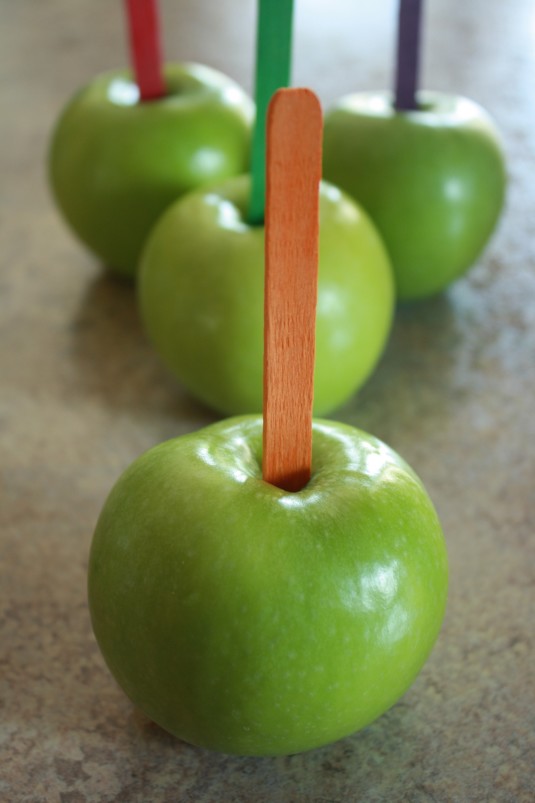
- 4 Granny Smith apples (or another tart apple) — Granny Smith is the classic choice. Honeycrisp works well too if you want a slightly sweeter result. Avoid Red Delicious — they tend to be mealy and the skin can be waxy in a way that resists caramel adhesion.
- Wooden craft sticks — Popsicle-style sticks work fine. Colored sticks are a fun touch if you’re making these for a party or with kids. Dollar Tree usually carries packs of 100 in fall.
How to Make Caramel Apples
The steps are easy to follow. Here is the complete walkthrough:
Step 1: Prep the Apples
Wash each apple and dry them well — towel dry and air dry for another 15-20 minutes. Remove the stems by twisting them off or cutting them with a knife. Push a wooden craft stick firmly into the top center of each apple where the stem was. You want to push it in enough so that it feels stable. About 2 inches should do. Give it a gentle twist-test — if it moves loosely, the stick isn’t going to hold once the apple has a full caramel coat and someone picks it up.
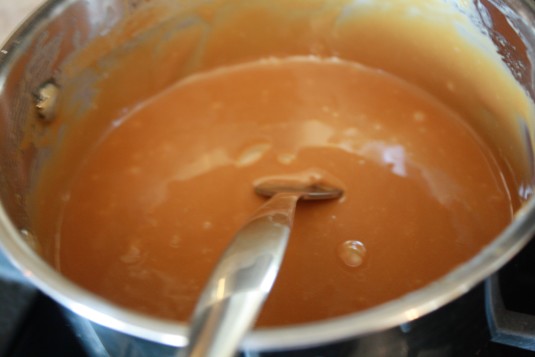
Step 2: Melt the Caramel
Place the caramel bits, water, and vanilla extract in a small saucepan and turn the heat to low. Use a spatula made of silicone or a wooden spoon to stir it constantly so that the bits can begin to soften and melt. After approximately 5 to 7 minutes of constant stirring, the mixture should become smooth and glossy. It should cover a spoon on the thick side. If it looks runny or watery your heat is too high. Caramel that is runny will not stick to the apple at all.
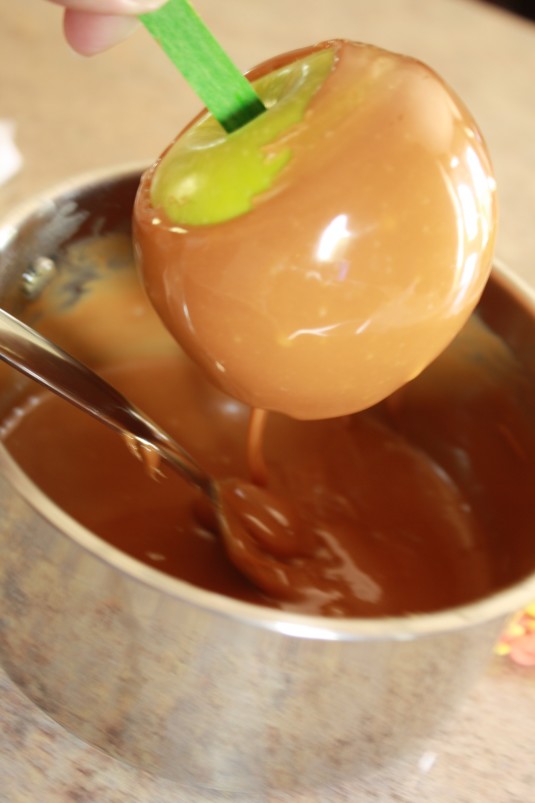
Step 3: Dip the Apples
Take the saucepan off the heat. Grab an apple by the stick and dip it into the caramel. If needed, pan tilt. Move the apple from side to side to get the caramel all the way around. Make sure to leave about half an inch from the top. Pull the apple out and let the leftover caramel drip back into the pan. Rotate the apple while it drips to avoid a big puddle at the bottom of the apple.
Step 4: Set on Wax Paper
Place a piece of wax paper on a cutting board or sheet pan that is flat and stiff enough to fit in the fridge. Lightly butter the wax paper or use a quick spray of cooking spray as a butter substitute. Prep each apple by placing it on the surface you prepped. Then, place the cutting board in the fridge for 15-20 minutes to set the caramel. The caramel will change from being glossy and tacky to having a solid, slightly chewy texture.
Helpful Tips
- If your caramel is sliding off: Your apple was either wet or too cold. Pat it completely dry and let it warm to room temperature before re-dipping. You can re-melt the caramel (very gently, over low heat) if it’s cooled too much.
- If your caramel is too thick to work with: Return the pan to low heat and stir in half a teaspoon of warm water. Stir until smooth and try again.
- Add toppings while the caramel is still tacky: Roll the dipped apple in chopped peanuts, mini chocolate chips, sprinkles, or crushed graham crackers immediately after dipping, before the caramel firms up. Once it’s set, toppings won’t stick without an extra layer of melted chocolate.
- Double or triple the batch: This recipe scales easily. One 11-oz. bag coats 4 medium apples. Two bags handles 8. The melting time is about the same — just give it a few extra minutes of stirring.
- Use a candy thermometer if you have one: You’re looking for the caramel to hit around 235–240°F (soft ball stage). This isn’t required for this recipe since the caramel bits are formulated to melt correctly, but it’s useful if you’re scaling up or using unwrapped caramels.
- Clean the pan while it’s warm. Caramel hardens into cement when it’s cold. Fill the pan with hot water and let it soak for a few minutes immediately after you’re done dipping — it’ll wipe clean effortlessly.
Serving Ideas
Caramel apples are perfect as they are, but here are some ideas to elevate them even more:
- Chocolate drizzle: Once the caramel is set, drizzle melted dark or white chocolate over the apple in a zigzag pattern. Let the chocolate set for another 10 minutes before serving.
- Peanut coating: Roll the still-tacky apple in finely chopped salted peanuts. The salt-sweet combination is genuinely good.
- S’mores apple: Roll in a mix of mini chocolate chips and crushed graham crackers. Kids go after these hard.
- Caramel apple slices: If you’re making these for a crowd and want something easier to eat, skip the sticks. Slice the apples and serve the caramel as a warm dipping sauce alongside. Same recipe, no sticks needed.
Variations
Chocolate-dipped caramel apples: Once the caramel has firmed up, grab some melted semisweet chocolate to dip the bottom third of the apple in. Place on wax paper and chill in the fridge until the chocolate is set.
For white chocolate caramel apples use the same method but drizzle melted white chocolate on top of the set caramel and sprinkle some flaky sea salt on top while the chocolate is still wet.
**Spiced caramel:** As the caramel melts, mix in 1/4 tsp of cinnamon and a small dash of nutmeg. This version is especially great in October!
Using unwrapped caramels: If you are unable to locate caramel bits, you can substitute them with one 14-oz. bag of unwrapped Kraft individually wrapped caramels. Same process, same amounts of water and vanilla. The bits are just faster.
What You Might Want to Have on Hand
While nothing is specialized is required, here are a couple of helpful tips:
- Kraft Caramel Bits — The 11-oz. bag is the right size for this recipe. If your grocery store is out, this is a reliable backup order.
- Wooden craft sticks — Standard popsicle sticks work. Colored sticks are a fun option for parties or making these with kids.
- Candy thermometer — Not needed for this recipe, but genuinely useful if you make caramel or candy in any other context.
Storage and Make-Ahead Notes
How long do caramel apples stay fresh? If you keep them wrapped in cellophane and stored in the fridge, the caramel apples will stay fresh for about a week. The caramel will remain solid and the apple will stay fresh and crunchy. After a week iis when the apples start to lose their firmness, the apple will begin to soften from the inside and the caramel will start to pull moisture from the apple which will make it sticky.
Can I prepare them in advance? Absolutely. In fact, it’s best to prepare them the day before you need them. This gives the caramel time to set, and also helps the apple firm back up from refrigeration. You can prepare them up to 24 hours ahead of time and store them in the fridge until you’re ready to serve.
Room temperature: You can leave out caramel apples for 2 hours max. Any longer and the apple will start to sweat out moisture and the caramel will start to get sticky. For parties, don’t leave the apples out all afternoon. Take them out of the fridge just before you’re ready to serve them.
Can you freeze caramel apples? Yes, but you shouldn’t. When you freeze them, they get mushy, and when you thaw them the caramel separates. Instead, make them fresh or store them in the refrigerator no more than a day in advance.
Frequently Asked Questions
Why is my caramel sliding off the apple?
More often than not, the apple was wet or cold. Caramel requires a completely dry, room-temperature surface to latch onto. Packing caramel apples is a perfectionist’s game. Even a very thin film of water will cause it to slide. After washing, be sure to pat the apples dry, and let them sit at room temperature for at least 15 minutes, and try again. If the caramel is still sliding, it may be too thin. Be sure you’re using low heat, and not adding too much water as this is likely the culprit.
Can I use any apple variety?
Firm apples are best for candied apples, and Granny Smith apples are the best option. The tartness balances the candied apple and keeps it from being overly sweet. Honeycrisp apples are also a good option, as well as Fuji and Pink Lady apples. Stay away from Red Delicious and McIntosh apples. Red Delicious apples are mealy in texture and have a thick, waxy coating that can resist caramel. McIntosh apples are too soft and will break down quickly.
My caramel is too thick. What do I do?
Put the pan back on low heat and add a small amount, about half a teaspoon, of warm water, stirring to loosen the caramel into a consistency that will coat a spoon evenly but will still slowly drip from the spoon. Be careful not to add water that is cold, as this can make the caramel seize.
Do I have to use Kraft Caramel Bits specifically?
Individually wrapped Kraft caramels are definitely a reliable option (just make sure to unwrap all of them, as it does take a minute, but they will yield the same results as the other options). You can also use store-brand caramel bits, but their quality can be a little inconsistent. Do not use jarred caramel sauce or caramel dip, as they are too moist and will not set to coat the apple sufficiently.
How many apples does one bag of caramel bits make?
One 11-oz. bag will coat 4 medium apples with a good thick coat. If your apples are big, you may only get 3 good coated apples. The recipe doubles easily – two bags, same ratios of vanilla and water, will coat 8 medium apples.
Can I add toppings after dipping?
Yes, but timing is key! Add toppings while the caramel is still warm and sticky so they will stick. Once the caramel sets in the fridge, toppings will not adhere to the apple without some sort of aid (think chocolate coating). Roll, press, or sprinkle toppings right after the apple comes out of the caramel before it goes on the wax paper.
Related Recipes
- CouponCravings Homepage
Easy Caramel Apples
Ingredients
- 1 package Kraft Caramel Bits 11 ounces
- 3/4 teaspoon vanilla extract
- 2 tablespoons water or as directed on caramel package
- 6 Granny Smith apples
- Craft sticks or popsicle sticks
- Optional toppings such as nuts sprinkles, or mini chocolate chips
Instructions
- Wash and dry apples very well. Remove stems and insert sticks.
- Line a baking sheet with parchment or wax paper.
- Melt caramel bits with water over low heat, stirring until smooth.
- Stir in vanilla extract.
- Dip each apple into the caramel, turning to coat. Let excess drip back into the pan.
- Add toppings while caramel is still sticky if using.
- Place apples on prepared pan and refrigerate until set.