

EDIBLE COOKIE DOUGH BARS
For those of you out there that LOVE cookie dough, you are going to LOVE this, edible cookie dough bars!!
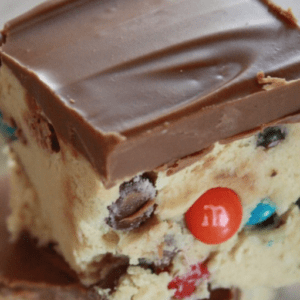
There’s nothing better than cookie dough except maybe cookie dough with chocolate chips and M&Ms and a peanut butter chocolate ganache layer on top pressed into an 8×8 pan then chilled and sliced into bars and served without baking, but these bars will totally satisfy your fix for raw cookie dough!
I love eating raw cookie dough and make batches of it for parties or to keep in the freezer, but you can’t really eat it unless it’s egg-free to avoid consuming raw eggs. Luckily, raw cookie dough is delicious without eggs, but you do still have to heat treat your flour to avoid any food-borne illness.
Flour may contain bacteria like E. coli that are destroyed during the baking process, which is why baked cookies are safe to eat.
The solution?
Heat treat the flour by spreading it out on a baking sheet and cooking it in the oven at 350° for 5 minutes, making sure to reach an internal temp of 160°, or, more conveniently, placing it in the microwave for 1 minute and 15 seconds, stirring it up every 15 seconds or so. Allow the flour to cool before using.
The most important thing with this recipe?
Make sure your flour is heat treated! Don’t skimp on that step!
The cookie dough will remind you of snacking on raw dough straight out of a batch of chocolate chip cookies, then surprise you when a layer of creamy, rich, fudgy chocolate and peanut butter ganache coats the top. Cut them into 30-40 bite-size bars, as most people eat 2-3 of them, and leave them out on a dessert tray or freeze them to eat later.
No oven required unless you’re using it to heat treat your flour!
INGREDIENT BREAKDOWN

Next up, make sure you’re using unsalted butter that’s properly softened at room temp. You need a total of 1 cup or 2 sticks of butter for this recipe.
Softened means that when you press it lightly it will give. It shouldn’t be greasy or feel like it’s melting.
If your butter is too hard you’ll end up with a lumpy dough. If you forgot to get your butter out of the fridge you can cut the sticks into tablespoon-size pieces then leave them out for 20 minutes on the counter to help speed up the process.
You’ll be using 3/4 cup of light brown sugar. Light brown sugar can be tricky to find.
Pack it firmly into the measuring cup when measuring. You can’t sub white sugar because you’ll be missing the molasses and the dough won’t taste right.
The star of the show is vanilla and you’ll be using the full 2 teaspoons in this recipe. Make sure to use vanilla extract, not imitation, because it’ll be a major factor in the flavor.
And lastly, 2.5 cups of heat-treated all purpose flour.
Condensed Milk, you’re going to need one 14 ounce can of sweetened condensed milk, it’s the egg replacer. Don’t sub evaporated milk.
Eagle Brand is the most common option.
Chocolate Chips/M&Ms, I used 1 cup mini chocolate chips and 1/2 cup mini M&M’s because I’m using an 8×8 pan and it’s easier to have an assortment of candies/chocolate chips in every slice when they’re mini. If you only have full sized you can totally use them in the same amount, there’s just going to be less of them in each piece.
Peanut Butter, you will need 1/2 cup for the topping as well as 1/2 cup of chocolate chips. Brands like Jif or Skippy tend to mix easier with the chocolate chips for me than natural PB.
The peanut butter/chocolate topping is what makes them cookie dough BARS 🙂
HOW TO MAKE EDIBLE COOKIE DOUGH BARS

Step 1: Heat-treat the flour.
Place the flour in the microwave and cook for 1:15, stirring every 15 seconds. Remove from microwave, it should smell slightly toasted and be barely warm to the touch.
Allow to cool to room temperature before using. If the flour isn’t completely cooled the fats in the butter will melt and create a greasy mess 🙁
Step 2: Get the pan ready.
Line an 8×8″ pan with parchment paper, lining just 2 sides and letting it hang over the edge for easy removal later. Set aside.
Step 3: Cream butter and sugar.
In the bowl of a stand mixer fitted with the paddle attachment or a medium sized mixing bowl if using a handheld mixer, beat together butter and sugar on medium-high speed for 2-3 minutes until pale, fluffy, and creamy. Add in the vanilla and beat to combine.
Step 4: Combine ingredients.
Mixer on low, alternate adding (cooled completely) flour and condensed milk, scraping down the sides of the bowl when necessary. Add the flour in 3 additions, add the sweetened condensed milk in 2 additions and finish with the flour.
Mix until just combined, dough should be soft and cohesive but not sticky, pinch a little between your fingers to test.
Step 5: Ensure that the M&Ms and chocolate are fully mixed.
Add mini choco chips and mini M&M’s with a spatula.
Step 6: Pack the dough into the pan.
Transfer the dough into the parchment paper lined square pan and use the bottom of a flat-bottomed glass or measuring cup to press the dough into an even layer. Make sure to press the dough into the edges and corners.
Press the dough as compactly as you can so you’ll be able to cut the bars nicely later on.
Step 7: Rest the dough layer.
Cover the pan and refrigerate until firm for at least 3 hours. This step can’t really be rushed because the peanut butter topping will sink into the dough if it’s not cold and firm.
Step 8: Prepare and apply the topping.
While the dough rests, prepare the topping. Add peanut butter and chocolate chips to a microwave-safe bowl and heat for 30 seconds.
Remove and stir. Continue heating and stirring for 30 second intervals until smooth.
Remove from refrigerator and quickly pour peanut butter topping onto chilled dough. Use a rubber spatula to quickly and gently spread topping onto the dough.
Try to spread it as gently as possible so you don’t pick up any of the dough.
Step 9: Final chill and slice.
Chill bars until topping is firm, at least 1 more hour. Remove slab of peanut butter bars from pan by lifting the parchment paper.
Transfer to cutting board. Use a sharp knife to cut bars into squares.
Wipe knife in between cuts for cleaner cuts. Bars are delicious straight out of the refrigerator or at room temperature.
STORAGE AND MAKE-AHEAD TIPS
These peanut butter dessert bars can be made up to 4 days ahead of time which makes them a great dessert to take to parties. Store in an air-tight container in the fridge for up to 1 week.
Bars can be stored in the freezer for up to 3 months. Simply place bars in a freezer-safe container or ziplock bag separating bars with parchment paper between each bar.
Remove as needed and enjoy right from the freezer. Alternatively, bars can be defrosted by storing them in the fridge for about 1 hour.
FREQUENTLY ASKED QUESTIONS
Why do I need to heat treat the flour?
Flour can contain harmful bacteria such as E. coli. There have been several instances where the CDC has issued warnings and recalls for products made with raw flour due to illness.
Heating flour for just 90 seconds eliminates the risk. This is especially important if you’ll be serving these bars to little ones or anyone whose medical status you don’t know.
Is it possible to skip the heat-treatment step?
You can skip this step if you choose, however, I strongly recommend heating flour before consuming raw flour recipes.
Can you add eggs?
No. The eggs would be even more risky than your typical raw cookie dough risk.
And besides, they’re in there just to act as a binder. The sweetened condensed milk does that job really well already.
Can you use other types of mix-ins?
Yes, you can, but because they’re small, things like chocolate chips or M&Ms won’t distribute evenly. Try bigger chunks if doubling the recipe and making them in a 9×13 pan and cutting them into squares rather than small bars.
The dough seems a little dry…
Note that some brands of flour absorb more moisture than others. If your cookie dough seems a little crumbly add 1 to 2 tablespoons of sweetened condensed milk at a time until incorporated.
When pressed together with your fingers it should hold together.
Can you leave off the PB-chocolate topping?
Sure, but then it’s pretty much just cookie dough. It’s good, but it just seems incomplete without the topping.
With it, the bars seem tidier and more of a dessert. If you want something not quite as heavy-handed as full-on ganache, you could always drizzle melted chocolate over them instead.
MORE RECIPES YOU’LL LOVE
If you loved these dessert bars, be sure to try out my other yummy sweet treats.
White Chocolate Popcorn Crunch
Who doesn’t love a combo of salty and sweet?! These deliciously crunchy bites are coated in white almond bark with peanuts and Rice Krispies mixed in.
Recipe here: White Chocolate Popcorn Crunch.
Crock pot lava cake
This rich and decadent dessert is SO easy to make thanks to the slow cooker.
Recipe here: Crockpot Lava Cake.
Crock Pot Chocolate Peanut Clusters
Chocolate, peanuts, almond bark, and the possibilities are endless when it comes to this recipe. Just let everything melt together and drop spoonfuls onto wax paper and enjoy.
Recipe here: Crock Pot Chocolate Peanut Clusters.
Cookie Dough Bars
Equipment
- Stand mixer or hand mixer
- Mixing bowls
- Measuring cups and spoons
- 8x8 baking dish
- Parchment paper
- Spatula
- Foil
Ingredients
- 1/2 cup butter softened
- 3/4 cup packed light brown sugar
- 1 teaspoon vanilla extract
- 2 cups all-purpose flour heat-treated and cooled
- 1 14- ounce can sweetened condensed milk
- 1 cup chocolate chips
- 1/2 cup mini M&M’s
- 1/2 cup creamy peanut butter
- 1/2 cup milk chocolate chips
Instructions
- Heat-treat flour and let it cool completely.
- Line an 8x8 baking dish with parchment paper.
- Beat softened butter and brown sugar until smooth and fluffy.
- Add vanilla and mix until combined.
- Gradually add cooled flour and sweetened condensed milk, alternating between the two, until a soft dough forms.
- Fold in chocolate chips and mini M&M’s.
- Press dough evenly into the prepared pan.
- Melt peanut butter and milk chocolate chips together until smooth.
- Spread topping over the cookie dough layer.
- Chill until firm, then slice into bars.