 Cool Whip & Frozen Yogurt Pie” class=”wp-image-150860″ />
Cool Whip & Frozen Yogurt Pie
I have been making this frozen yogurt pie for years. It’s that easy and good. It has four ingredients (some of which are probably already in your kitchen), and it doesn’t require an oven. It will look like you planned on making this for a long time once you take it out of the freezer. It’s creamy and cold, and so easy to slice. If you have yogurt and Cool Whip in your fridge, then you’re already most of the way there!
What I like best about this one is that other than a few hours of freeze time, there is no planning needed. You mix the filling in a bowl, pour it over a crust, and the freezer does the rest. That’s honestly the entire thing.
What Makes This Recipe Reliable
- No baking — the freezer does all the work
- Cool Whip gives the filling its creamy, sliceable texture (straight yogurt alone would freeze icy)
- The yogurt carries the flavor, so there’s no need for pudding mix or extra sweeteners
- It holds together cleanly when sliced — no crumbling, no soupy mess
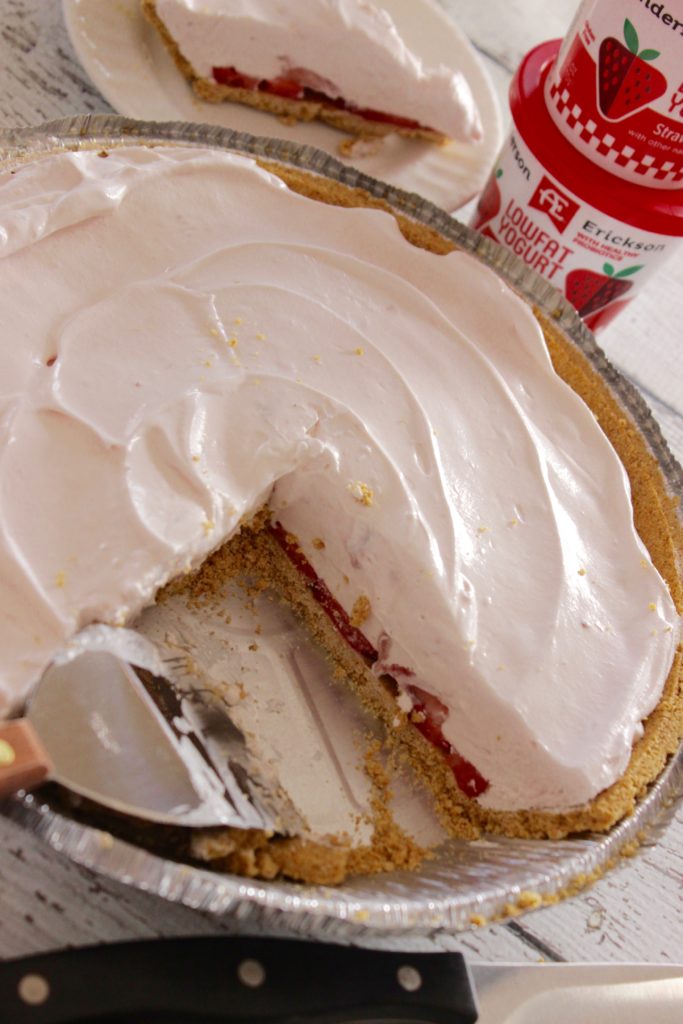
- The fruit layer at the bottom means you get some in every bite, not just decorating the top
- Swapping flavors is easy — the structure stays the same no matter what yogurt you use
What to Know Before You Start
It may seem like the ratio of yogurt to Cool Whip doesn’t matter, but believe me, it does. For this recipe, we are using two small yogurt containers (approximately 10.6 oz total) to one 8 oz container of Cool Whip. That ratio is what keeps the texture creamy and not icy. If you double the yogurt thinking that will give you more flavor, you will end up creating something that freezes into a solid block instead of a sliceable pie. Trust the ratio.
Before you start mixing, ensure that your Cool Whip has completely thawed. If it hasn’t, it won’t incorporate smoothly, leaving you with undesirable chunks. You can place it in the fridge the night before, or if you are in a rush you can remove it from the fridge and place it on the counter for 20-30 minutes before starting.
At least 4 hours of freezing is a must, but overnight is even better. When a pie has been in the freezer overnight, it slices cleaner, and also holds its shape better. In 4 hours the pie is set, but if your freezer runs warm, the center may still be a little soft.
When it’s coming out of the freezer, leave it at room temperature for 5 to 10 minutes before cutting into it. That short break will help prevent the knife from shattering the crust. Don’t ignore it.
Ingredients
Graham Cracker Crust
I use store-bought pie shells almost all of the time. They are reliable, fit a standard 9-inch pie dish, and save you a step. However, if you want to make your own crust, crush about 1.5 cups of graham crackers, mix them with 5-6 tablespoons of melted butter and 2 tablespoons of sugar, and pat it into a pie dish. Then chill it in the fridge for 20 minutes before filling. Either way, the pie tastes about the same no matter which crust option you go with.
Yogurt (2 containers, 5.3 oz each)
All of the flavor comes from here. For a strawberry Cool Whip pie, strawberry is the traditional option, and it pairs nicely with the graham cracker crust. However, the recipe is truly versatile. Any fruit yogurt of your choice will do. Peach, blueberry, raspberry, or vanilla will give you a different outcome without altering anything about the method.
Standard yogurt will give a softer, creamier result. Greek yogurt will create a filling that is thicker and more tangy — it will be a distinctly different, more dense than airy texture, but still sets and slices properly. If you prefer a Greek yogurt dessert sensation, that substitution will work. Just keep in mind it alters the mouthfeel.
Just a note: steer clear of drinkable yogurt or anything that says “blended” on the label. It’s usually way too liquidy and will mess up the texture when you freeze it.
Cool Whip (1 container, 8 oz, thawed)
This is why it makes the pie sliceable instead of icy. The whipped texture lightens the yogurt and gives the frozen creaminess you’re going for. Low fat Cool Whip works just as well — I’ve used it regularly and can’t tell the difference in the finished pie. And don’t use regular whipped cream here; it doesn’t freeze the same way and the texture suffers.
Fresh Strawberries (about 1 cup, sliced thin)
The fruit goes under the filling and sits on the bottom of the crust. It is not a very thick layer. Just enough to get fruit into each slice. The most important thing is to cut the fruit into thin slices. That’s right. Thick pieces of fruit will freeze solid and will be tough to cut through once the pie is set. Thin pieces freeze and are easier to chew.
You can replace strawberries with whatever you have access to: blueberries, sliced peaches, raspberries, or mandarin orange segments, all work. Just keep the pieces small and the layer light.
How to Make Frozen Yogurt Pie
Step 1: Prep the crust
If you are using a shop-bought graham cracker crust, simply remove it from the packaging and place it on a flat surface. That’s it — there’s no need for pre-bakes or further fuss!
If you’re making your own, you should crush some graham crackers. To do this, take 1.5 cups of graham crackers and crush them into small pieces. A zip-top bag and rolling pin work well for this. Then, mix the graham crackers with 5 – 6 tablespoons of melted butter and 2 tablespoons of sugar. After that, press the mixture firmly into the bottom of a pie dish. Finally, allow the pie dish to chill in the fridge for at least 20 minutes. This will allow the crust to hold together when you add the pie filling.
Step 2: Add the fruit layer
Slice your strawberries thin, about 1/4 inch thick, and place them in a light single layer at the bottom of the crust. You are not packing them in, just enough fruit should be spread out so that every slice catches some. If they are in a thick pile, the filling will not settle evenly around them.

Step 3: Mix the filling
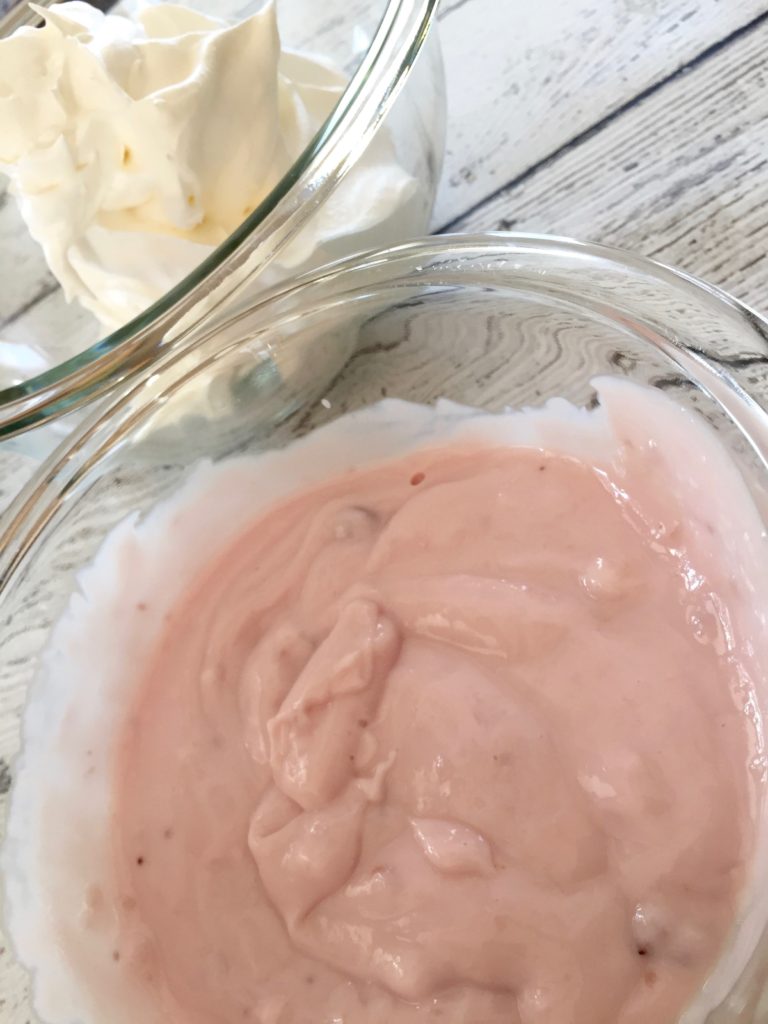
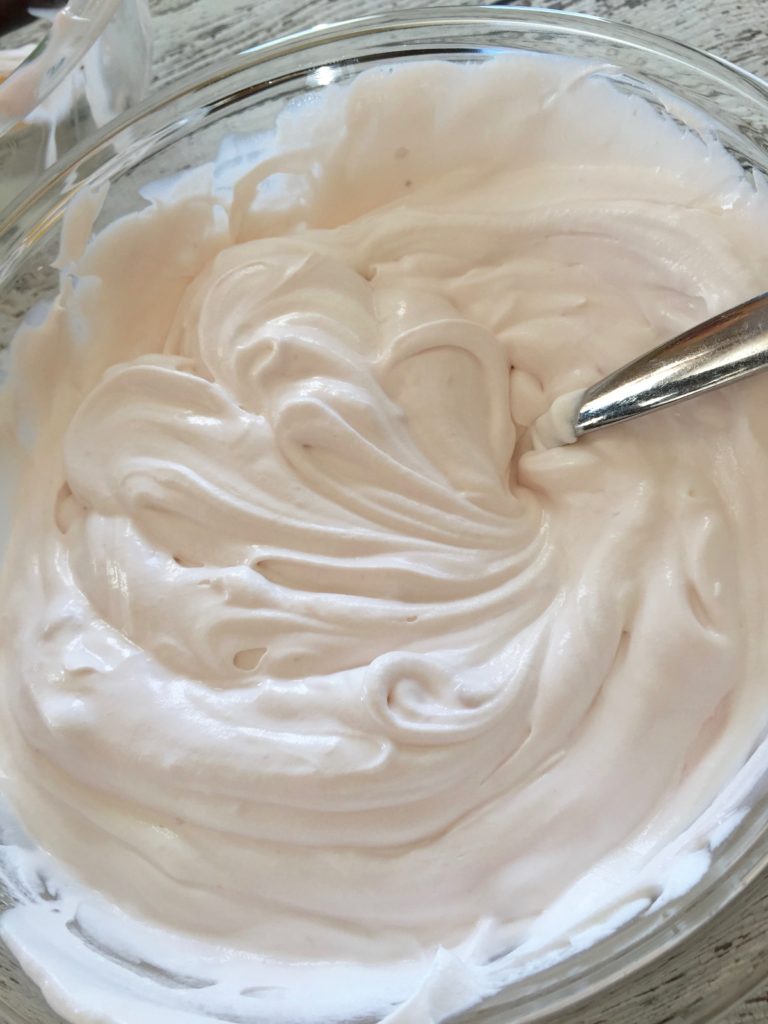
In a medium mixing bowl, combine the two tubs of yogurt and the thawed Cool Whip. Mix until it is smooth and uniform. There should be no streaks or white pockets of Cool Whip. Stirring this mixture usually takes about a minute. The filling should look a light pink (if using strawberry) and be fluffy and uniformly mixed.
For an even distribution of filling and texture without creamier or streaky ice cream bites and clean cuts without streaks of filling, take your time when mixing.
Step 4: Fill the crust
Use a spatula to spread the filling evenly to the edges over the fruit layer. Make sure the filling is even so that the crust edges will hold the slices together. If the filling is thick in the middle and thin at the edges, then those slices will be unstable.
Step 5: Freeze
Tightly cover the pie with foil or the plastic lids that came with the store-bought crust. Place the pie flat in the freezer — make sure nothing is on top that could press the foil down into the filling.
The best freezing time is 4 hours. However, if you want a pie that will slice cleanly, hold its shape, and can sit on a plate, then freezing it overnight is the best option. For company, the best option is to put it together the night before and let it freeze overnight. That way, there is no stress the next day.
Step 6: Serve
To slice your pie, remove the pie from the freezer, and set it on the counter for about 5 to 10 minutes. This is really important. If you don’t wait, you will have a difficult time slicing the pie. Also, the pie might have a chance of damaging the crust if it is too frozen and you have to put in a lot of effort to slice it. After the time passes, take a sharp knife and cut it into slices. If you want the edges to be really clean, wipe the knife off in between slices.
Helpful Tips
- Thaw the Cool Whip first. This is the step people skip and then regret. Cold Cool Whip doesn’t blend smooth — thaw it in the fridge overnight or on the counter for 20–30 minutes before you start.
- Slice the fruit thin. Thick chunks of frozen fruit are hard to cut through and even harder to eat. Aim for ¼ inch or thinner.
- Stir until it’s actually smooth. Take the 60 seconds to get the filling fully blended. Streaky filling freezes unevenly.
- Let it rest before slicing. Even 5 minutes makes a real difference. The knife goes through cleanly instead of cracking the crust.
- Don’t overfill. If you heap the filling above the crust rim it gets messy fast. Keep it level with or just below the top of the crust.
- Wipe the knife between cuts. For cleaner slices, wipe the blade after each cut. Takes two seconds and the presentation is noticeably better.
- Cover it well in the freezer. If the pie isn’t sealed tight, it’ll pick up off-flavors from the freezer within a day or two.
Flavor Variations
The ingredients used in this pie yogurt, Cool Whip, graham cracker crust, and fresh fruit, always keep the same structure, regardless of what flavor you choose. All of these combinations work well:
- Peach: Peach yogurt + sliced fresh or well-drained canned peaches. Good in late summer when peaches are at their best.
- Blueberry lemon: Blueberry yogurt + lemon yogurt (one container each) + fresh blueberries. The lemon cuts through a little and keeps it from being too sweet.
- Vanilla berry: Vanilla yogurt + mixed berries. More neutral base if you want the fruit to do the talking.
- Tropical: Pineapple or coconut yogurt + mandarin orange segments. Add a tablespoon of shredded coconut to the filling if you want, but don’t overdo it — too much solid mix-in and the filling won’t set as smoothly.
- Raspberry: Raspberry yogurt + a handful of fresh raspberries in the bottom layer. Slightly tarter than strawberry and a good choice if you want something less sweet.
- Higher protein version: Substitute Greek yogurt for regular yogurt. The pie will be thicker, denser, and tangier — more of a Greek yogurt dessert than a light whipped pie, but it still works and slices well.
Storage and Make-Ahead
You can keep this pie in the freezer for up to one week; after this, the crust will soften to the point where it may be unappetizing, and the filling will take on freezer taste if it isn’t covered well.
If you’re stashing it away, wrap it up tightly in foil or plastic wrap and place it in an airtight container. If you bought it, the carton it came in has a plastic lid in it. Use the lid; it creates a better seal than foil alone.
When serving a pie that has been partially eaten, you will want to cover cut edges with plastic wrap so it’s pressed over the filling before you re-seal it. This keeps the cut edges from drying or becoming excessively frozen.
Notes for making ahead: It’s one of the best desserts to make ahead since you can prepare it the night before and freeze it. No last-minute preparation steps are required and it’s ready to serve the next day! If it’s going somewhere, you can put it in a cooler with ice for 15-20 minutes to keep it cold, and it won’t get too soft. If you’re going to be longer than 20 minutes, you’ll want to keep it refrigerated.
FAQ
Can I use Greek yogurt instead of regular yogurt?
Yes, it will work — but the texture will be different. Filling will be thicker and denser with a more tangy flavor since it uses Greek yogurt. It still sets properly, and slices cleanly. If you are used to the more airy texture of regular yogurt + Cool Whip, the Greek version will feel more filling. There is no right or wrong here. Greek yogurt has more protein if that is a concern for how you are serving it.
What happens if I use too much yogurt?
The pie will be icier and denser if you freeze it rather than creamy. The Cool Whip helps keep it sliceable and light in texture — adding more yogurt than the recipe indicates decreases that effect. Use two 5.3 oz containers (10.6 oz total) to one 8 oz Cool Whip. That ratio is what makes this work.
How far ahead can I make this?
One day in advance is best! This way it will be set, and the texture will be perfect. Plus, it isn’t stored long enough for the freezer to ruin the flavor. Although you can make it up to two or three days in advance, you can oftentimes notice the flavor and texture degrade after a week, so it is not recommended. Store so it is covered well!
Can I use a different crust?
The ideal style of frozen pie in this case is the graham cracker crust, as it stays firm enough to hold the slice without falling apart, yet isn’t so stiff that it’s hard to slice through. An Oreo cookie crust is good as well, especially with chocolate or vanilla yogurt. An Oreo base makes it richer, which could be a good or bad thing depending on your preference. Stay clear from blind bakes pastry crusts as they freeze in undesirable ways and don’t hold up in the freezer.
Why is my pie icy instead of creamy?
Often only one of three things is the cause: the ratio may have been off (too much yogurt compared to the Cool Whip), the Cool Whip may not have been completely thawed at the time of mixing so it may not have blended well, or the filling may not have been stirred smooth enough before pouring. It is also possible that the pie was stored uncovered and moisture and ice crystals were picked up. Any of these will ruin the texture. The solution to avoid this next time is to use a thawed Cool Whip, ensure the mixture is completely smooth, and make sure to cover it well in the freezer.
Can I add mix-ins to the filling?
Some mix-ins work like fine shredded coconut, miniature chocolate chips, or a small handful of marshmallows. However, it’s best to just do a tablespoon because you don’t want to go overboard. If there are too many mixture pieces, it makes the filling more difficult to spread, and it make more difficult to set cleanly. Rather than thinking of mix-ins as the bulk of the filling, think about them as a nice accent. If you want a recipe that is more loaded than this one is probably not the best recipe base for you.
Related Recipes

Frozen Yogurt Pie
Equipment
- Mixing Bowl
- Spoon or spatula
- 9-inch pie dish (if not using pre-made crust)
- Freezer
Ingredients
- 1 9- inch graham cracker crust
- 2 5.3- ounce containers yogurt strawberry or flavor of choice
- 1 8- ounce container Cool Whip thawed
- 1 cup fresh strawberries sliced thin
Instructions
- Add a thin layer of sliced strawberries to the bottom of the graham cracker crust.
- In a mixing bowl, combine yogurt and thawed Cool Whip until smooth.
- Pour mixture over strawberries and spread evenly to the edges.
- Cover with foil or a lid and place in the freezer.
- Freeze at least 4 hours, or until fully set.
- Let sit at room temperature 5 to 10 minutes before slicing and serving.