Microwave Caramel Chex Mix Recipe
In less than 15 minutes and in only one bowl, you can make this recipe. Plus, it will disappear faster than anything else on the snack table! The crispy cereal will be protected by the crunchy stick caramel coating, and you won’t even have to preheat the oven!
What sold me the first time was the last part. I was late for my friend’s game night, and I needed something to make me look like I actually tried. It was a Saturday in January.
I don’t even know how many times I have made this. It has been to game nights, basketball watching parties, holiday cookie exchanges (yes, it works for that), and a handful of times when friends came over last minute and I needed something out fast.
You can prepare this in advance because the batch freezes excellently. Just take it out when you need it. This is honestly one of those recipes that pays for itself.
What Makes This Microwave Caramel Chex Mix Work Every Time
- No oven needed. The whole caramel is made in the microwave in two short bursts — no candy thermometer, no stovetop vigilance.
- The baking soda does real work. Stirring it in at the end aerates the caramel slightly, giving you a lighter, crunchier coating instead of a dense candy shell.
- Brown sugar caramel sets firmly. Once it cools, the coating snaps cleanly without being tooth-breaking hard.
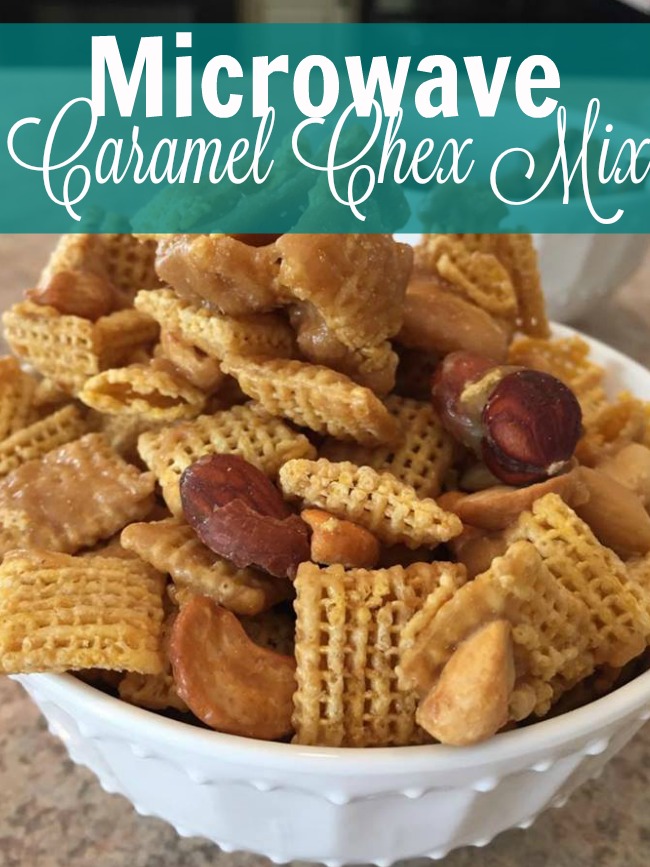
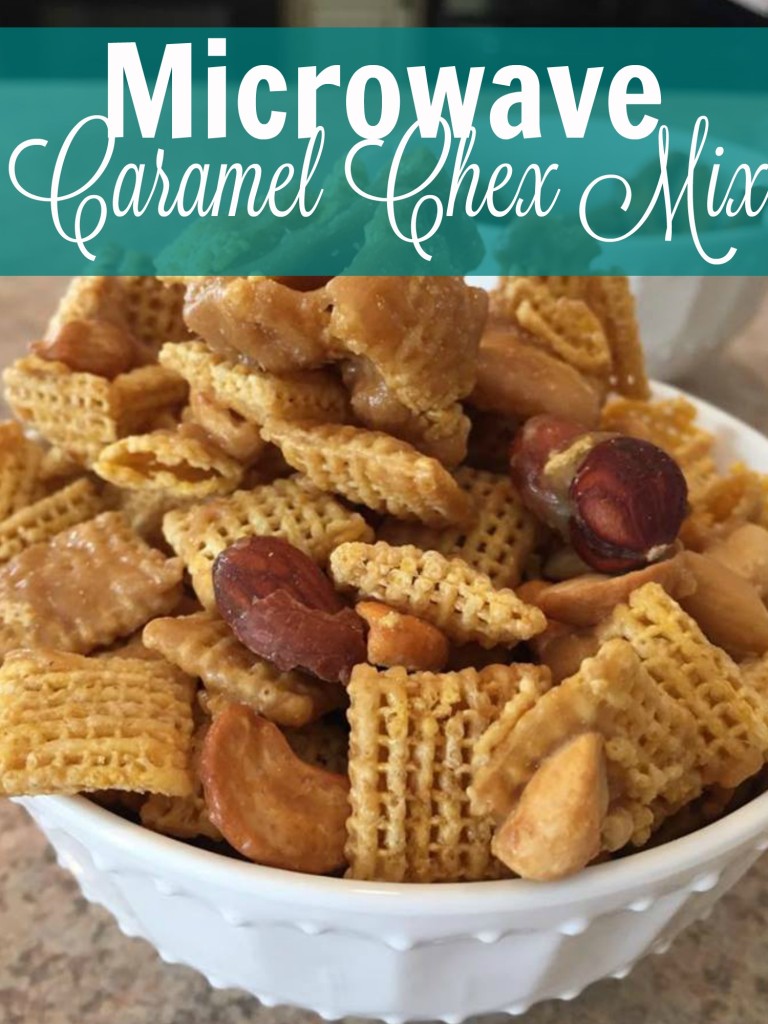
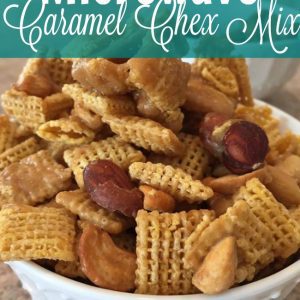
- Nuts add texture contrast. The cereal gives crunch; the nuts give something to chew through. Both matter.
- It freezes without going soggy. Most caramel snack mixes lose their texture in the freezer. This one holds up well for weeks.
- One large bowl to coat, one sheet pan to cool. Cleanup is minimal, which matters when you’re making this for a crowd.
What to Know Before You Start
To avoid surprises, here are a few helpful tips:
Microwaves wattage is important because being under powered means the food won’t cook, and if over powered, food will over cook. 900 to 1200 watts is the standard wattage found in most microwaves today.
The timing in this recipe has been adjusted for a standard 1000-watt microwave. If your microwave is more powerful (you can check the label on the inside door), lower each round by 15-20 seconds and watch for boiling.
If the mixture cools down you may have to increase the cooking time by 20 to 30 seconds. When the caramel is done it should be bubbling very vigorously.
Select a microwave-safe bowl that is larger than average. When the baking soda is added and mixed in, the caramel will puff up and many bowls that seem large enough actually aren’t.
Surpass your expectations.
You need to work fast once you put in the baking soda. After the caramel is ready and the baking soda is in, you need to quickly pour it over the cereal.
If you take too long, it cools and begins to set, making it more difficult to apply an even coating.
If you have one, put a silicone baking mat on your cookie sheet. If you have some parchment paper, put that down, too. Otherwise, your pan will be super sticky!
If you don’t, grease the pan a little — it makes it easier to break apart the cooled mixture, plus it saves you some scrubbing later.
Make sure to let it cool down before putting it away. If you store it while it’s still warm, the container will get moisture on the inside which will soften the coating.
Leave it on the pan to rest for a minimum of 30 minutes at room temperature.
Ingredients for Microwave Caramel Chex Mix
Here is what is included in this mix and the importance of each one:
For the Caramel
- Brown sugar — The base of the caramel. Brown sugar has molasses in it, which is what gives this coating its deeper, slightly toasty flavor. White sugar works in a pinch but the result tastes flatter.
- Butter — Adds richness and helps the caramel emulsify. Use real butter, not margarine. Margarine has higher water content and the caramel can seize up or not set properly.
- Light corn syrup — This is what keeps the caramel from crystallizing and going grainy. It’s not optional if you want a smooth coating. Honey works as a substitute but changes the flavor noticeably.
- Salt — Balances the sweetness. Don’t skip it — unsalted caramel tastes one-dimensional.
- Vanilla extract — Added after the microwave steps, not before. Heat destroys vanilla’s volatile flavor compounds, so stirring it in at the end gives you more flavor.
- Baking soda — This is the trick. When you stir it into hot caramel, it creates tiny air bubbles that lighten the texture. The coating goes from dense and sticky to airy-crunchy. Don’t skip it and don’t add it early.
For the Mix
- Rice Chex or Corn Chex — Both work. Rice Chex is a bit lighter and crispier; Corn Chex has a slightly more substanial crunch. You can use a combination. Wheat Chex has a stronger flavor that can compete with the caramel — use it sparingly if at all.
- Mixed nuts or peanuts — Adds heft and salt contrast. Cashews, pecans, and peanuts all work well. Walnuts can go slightly bitter when coated in hot caramel, so I’d leave those out.
How to Make Microwave Caramel Chex Mix
While the process sounds simple, it will go by fast once the caramel is ready. You should read the steps before starting.
Step 1: Set Up Your Pan and Bowls
Take a baking sheet with a rim and line it with a silicone mat or parchment paper. Put this aside for now. Also set aside a large mixing bowl with the Chex and nuts that have been measured previously.
Since the caramel is quick, prepare everything ahead of time.
Step 2: Combine the Caramel Ingredients
In a bowl that will fit all the ingredients comfortably, add the brown sugar, butter, corn syrup, and salt. Do a quick stir just to combine the ingredients.
We understand that it won’t be combined fully yet.
Step 3: First Microwave Round
Be careful when taking the bowl out because it may be hot. Heat it in the microwave for 2 minutes and 30 seconds on the highest setting.
Stir everything together. If you want, you can let the butter melt completely. The mixture will become smooth and somewhat like caramel.
Step 4: Second Microwave Round
Put the bowl back in the microwave for another 2 minutes. When done, the bowl should be actively bubbling. There should be a pleasant caramel odor and toasty sweetness with some smokiness around the edges.
If your microwave is getting hot and the edges are getting too dark, take it out at 1 minute 45 seconds.
Step 5: Add Vanilla and Baking Soda
Now, pour in the vanilla extract and baking soda, then stir some more. You want the mixture to foam and turn a lighter color. That’s perfect.
Its color gradually shifts from a deep amber hue to a lighter, slightly frothy caramel color which is what gives that lighter crunch in the finished mix.
Step 6: Coat the Cereal
Place the hot caramel sauce in the large bowl with the Chex and nut mixture. Stir and fold to coat everything as evenly as possible.
Hurry! The caramel sets while cooling and once it starts to firm up, it can no longer be moved around. Don’t worry if you see pieces that are not coated or that are over coated; that’s part of the fun!
Step 7: Spread and Cool
Spread the coated mixture onto the prepared sheet pan. It does not have to be completely flat; lumps and clusters are expected.
It will take about 20 to 30 minutes to cool to room temperature. Keep in mind, however, that the caramel will harden as it cools, solidifying the clusters.
Once it has cooled completely, use your hands to break apart any large chunks and put it in an airtight container.
Six Things That Actually Help When Making This
Don’t skimp on the bowl size for the caramel
When baking soda is added, the caramel will foam a lot. A bowl that looks large enough to start with could overflow as the foam rises.
I use the biggest Pyrex bowl I have, and I even hold one hand out to grab it if it starts to rise too fast. The first time I made this I made the mistake of using a bowl that was too small, and I ended up getting caramel foam all over the microwave turntable. Lesson learned.
Parchment paper is worth it
Caramel is made from melted sugar, and it will, unfortunately, stick to bare sheet pans. To lift the whole slab off the pan and break it into pieces without scraping your pan, use either parchment paper or a silicone baking mat.
If you don’t have either, put lots of grease on the pan. You can expect to clean a lot more, though.
Stir the caramel well between microwave rounds
Butter and sugar may separate a little during initial cooking. They can be re-combined by stirring and then broken apart again before the heat causes a second melting.
Just give it a quick stir for thirty seconds.
Clusters are a feature, not a problem
You don’t need to try to break the mix apart before it cools. Just spread it out on the pan to form large, cluster sheets. After it hardens, you will be able to break it apart.
The best part is definitely those clusters — a few pieces of cereal stuck together with caramel that have a nice snap of crunch when you bite into them.
A pinch more salt changes everything
An easy way to enhance the salted caramel flavor is to increase the amount of salt in the recipe. Alternatively, you can add some flaky sea salt to the top of the mixture after it cools. This small change can transform the flavor!
Scaling up: make the caramel in batches
This recipe is simple to double. When you make the caramel, do two batches instead of one. It will be more difficult to time and manage foam if you double the caramel in one bowl.
Working fast, you could coat a double batch of Chex with two rounds of caramel.
Four Ways to Change It Up
Add pretzels or popcorn
You can substitute some of the Chex with mini pretzels or plain popped popcorn. Each offers a different texture–the pretzels give a salty crunch, while the popped corn gives a lighter, airier crunch.
If you are using popcorn, please make sure it consists of fully popped kernels and that it isn’t too heavily salted. The caramel will add sweetness and can throw off the balance.
Chocolate drizzle after cooling
Fully cooling and setting the mixture are the first steps. Then melt some semi-sweet chocolate chips, and drizzle the chocolate over the top with a fork, or use a small piping bag if that helps. Break the mixture into pieces once you allow the chocolate to set fully.
It is pleasing to experience the mixture of sweet caramel with dark chocolate which has a bitter taste. Because of its great transportability, this version is wonderful for gifts.
Cinnamon or cayenne in the caramel
Add a half teaspoon of cinnamon to the caramel before microwaving it. If you want to add a kick, a pinch of cayenne pepper will do the trick! The cinnamon provides a nice fall vibe to the caramel and the cayenne gives a soft heat that builds in the back of your throat, making you reach for another handful.
Weird, but still good for those who like that kind of thing.
M&Ms or chocolate chips as a stir-in
Wait for the mixture to cool to room temperature before stirring in your preferred add-ins. The hot caramel will melt the candy coatings and chocolate chips, resulting in ugly streaks and melted chocolate blobs. Great add-ins to consider once the mixture cools include mini M&Ms, chocolate chips, and sprinkles.
How Long This Keeps (and Why the Freezer Is Your Friend)
Room temperature
Store at room temperature for a week in an airtight container and the coating will stay crisp and moisture will stay out.
For locations with high humidity, try putting a folded paper towel in the container to absorb excess moisture.
Freezer
This mix can be kept in the freezer for six weeks. To defrost, leave for 15-20 min at room temperature.
The sweet coating stays crunchy even after the treat is frozen and does not become soft and sticky like other caramel snack mixes. I like to keep some in the freezer to surprise guests.
Make ahead for events
The night before the party, place your snack in an airtight container. It will still taste good if made an hour before, but will taste way better from being stored in the container. Set caramel will taste better the next day from the flavors melding together. Molding them together is one of the better things make-ahead snacks.
Equipment Worth Having
For the recipe, you do not need anything fancy. Although, there are two items that do make it a little easier:
- A large rimmed baking sheet — The rim keeps the mix from sliding off the edges as you spread it. A flat cookie sheet works but the rimmed version is easier to handle. A good rimmed baking sheet set holds up well to regular use.
- A large Pyrex or glass mixing bowl — Glass handles the microwave heat safely and you can see the caramel bubbling, which helps you gauge when it’s ready. A large one (at least 4 quart) gives you room for the foam.
Microwave Caramel Chex Mix FAQ
Can I make this without corn syrup?
Use honey or pure maple syrup if you want, but keep in mind it will change both the texture and the flavor. Because corn syrup is an invert sugar, it stops crystallization. Without it, your caramel may get grainy as it cools.
Although honey adds a floral hint to the caramel and does its job, **maple syrup** could offer a stronger flavor that, for some, may clash with Chex. Regardless of which you choose, you’ll have to baby the caramel a little more than usual since natural sugars burn way faster than sugar from corn syrup.
Why did my caramel turn grainy or crystallize?
Some possible reasons are: not enough corn syrup was used, you over stirred during the melting sugar stage, or maybe a sugar crystal on the side of the bowl got reincorporated into the dip. If it starts to look grainy before you’ve added the baking soda, you can sometimes salvage it by adding a teaspoon or so of water, but you need to be quick.
You can still eat grainy caramel; it will just be a different texture and coating.
Why does the baking soda go in at the end?
Baking soda is a leavening agent. It reacts with the acids in brown sugar and heat, which produces carbon dioxide. When baking soda is added to hot caramel just before the end, it traps and retains gas bubbles in the caramel. This results in a more airy texture, and the coating crunchier.
Adding it at the start would cause a reaction during microwaving and would make a mess and lose the effect. Adding it at the end is purposeful and is significant.
Can I use any Chex variety?
For this recipe, we suggest using Rice Chex or Corn Chex. Because of their neutral flavor, the caramel coating will shine as the main taste.
Complaints about Caramel are due to the changing overall flavor profile of the mix. Wheat Chex are heartier and have a more grainy flavor profile that will clash with the caramel. For the most traditional result, go with Rice or Corn.
How do I know when the caramel is done?
After the second round, the caramel should have a bubbly consistency and a deep amber color. It should smell toasty and sweet, not burnt. If you smell anything bitter or acrid, or notice dark edges forming, it’s gone too far.
If your microwave is a little hotter than others, take it out at 1 minute 45 seconds. The caramel will keep cooking a little bit from the residual heat from the container so under is better than over.

More Snacks That Disappear Fast
These are definitely worth saving if you enjoy uncomplicated treats that can easily be shared:
- Spicy Pretzel Snack Mix — A savory counterpart to this sweet mix. Great for people who prefer heat over sweet.
- Candy Coated Popcorn Balls — Another no-oven snack that makes ahead well and travels to parties easily.
Tell me in the comments how your microwave caramel Chex mix turned out!
Microwave Caramel Chex Mix
Ingredients
Ingredients
- 1 cup brown sugar
- 1 stick butter
- 1/4 cup light corn syrup
- 1/2 teaspoon salt
- 1 teaspoon vanilla
- 1/2 teaspoon baking soda
- 1 box Chex cereal
- 1 small can mixed nuts use your favorite kind
Instructions
Instructions
- Combine the brown sugar, butter, corn syrup, salt, and vanilla in a microwave-safe bowl.
- Microwave for 2 1/2 minutes.
- Stir, then microwave for another 2 minutes.
- Add the baking soda and stir carefully. The caramel will foam up.
- Pour the Chex cereal and mixed nuts into a large bowl.
- Pour the caramel mixture over the cereal and nuts and stir until coated.
- Spread the mixture onto a cookie sheet to cool.
- Once the mixture is mostly dry, pull large chunks apart into manageable pieces and let cool completely.