
Slow Cooker Pot Roast
Hands down the most popular pot roast at our table is this easy slow cooker pot roast made with brown gravy mix, garlic powder, red potatoes & carrots. After years of pot roast recipes with wine, herbs, fresh stock, etc.
This simple version always wins.
Why This Slow Cooker Pot Roast Works
- The right cut of beef: chuck roast
- Layered ingredients
- Low & Slow cooking time (8 hrs)
- Plenty of liquid
These are the most common mistakes people make when they make a pot roast recipe in the slow cooker that didn’t turn out right.
Chuck Roast Is the Right Cut
Chuck roast is a cut of meat taken from the shoulder of the cow. It’s a great choice for slow-cooking in the crockpot as it has plenty of fat and connective tissue that will cook down making your pot roast incredibly flavorful and tender.
After eight hours in the crockpot the connective tissue will have transformed into gelatin giving you that silky, tender bite. It will also help to thicken your gravy.
Avoid cuts of beef that are more lean such as eye of round, sirloin, etc. There’s not enough fat and they will dry out in the slow cooker.
Low and Slow Is Non-Negotiable
When people think slow cooker they think easy. Throw everything in and walk away.
Well, there is a couple of things you need to consider to make sure you have the most incredible pot roast possible.
Slow cookers have two settings:
- high
- low
People assume high equals better. However, the high setting is meant to get your crockpot contents to a boil and maintain the boil.
Perfect for making soup but NOT ideal for pot roast.
By making this chuck roast recipe on low it will be fall apart, fork-tender perfection. Carrots will be perfectly cooked and your house will smell AMAZING.
All without lifting a finger. Perfect.
My guests always ask what I did differently to make dinner as they are convinced I must’ve slaved over the stove for hours. Little do they know I just popped everything in the crockpot in the am, set it on low and walked away.
Don’t be tempted to cook this recipe on high. Cooking the roast too quickly will cause the muscle fibers to tighten before the connective tissue completely breaks down, resulting in a really fibrous, tough roast.
Trust me, it is worth waiting for the meat to break down the way it’s supposed to over eight hours on low. It will also affect the flavor.
Adding Gravy at Hour Seven
Yes, I’m asking you to add a packet of gravy part-way through cooking, trust me, it’s worth it. The gravy added at the beginning of the recipe dissolves into the cold water and flavors the beef while it’s cooking.
Adding the second packet of gravy at hour seven intensifies the flavor again as cooking softens the flavor quite a bit, and will give you a slightly thicker gravy to spoon over your roast when serving.
Layering Matters
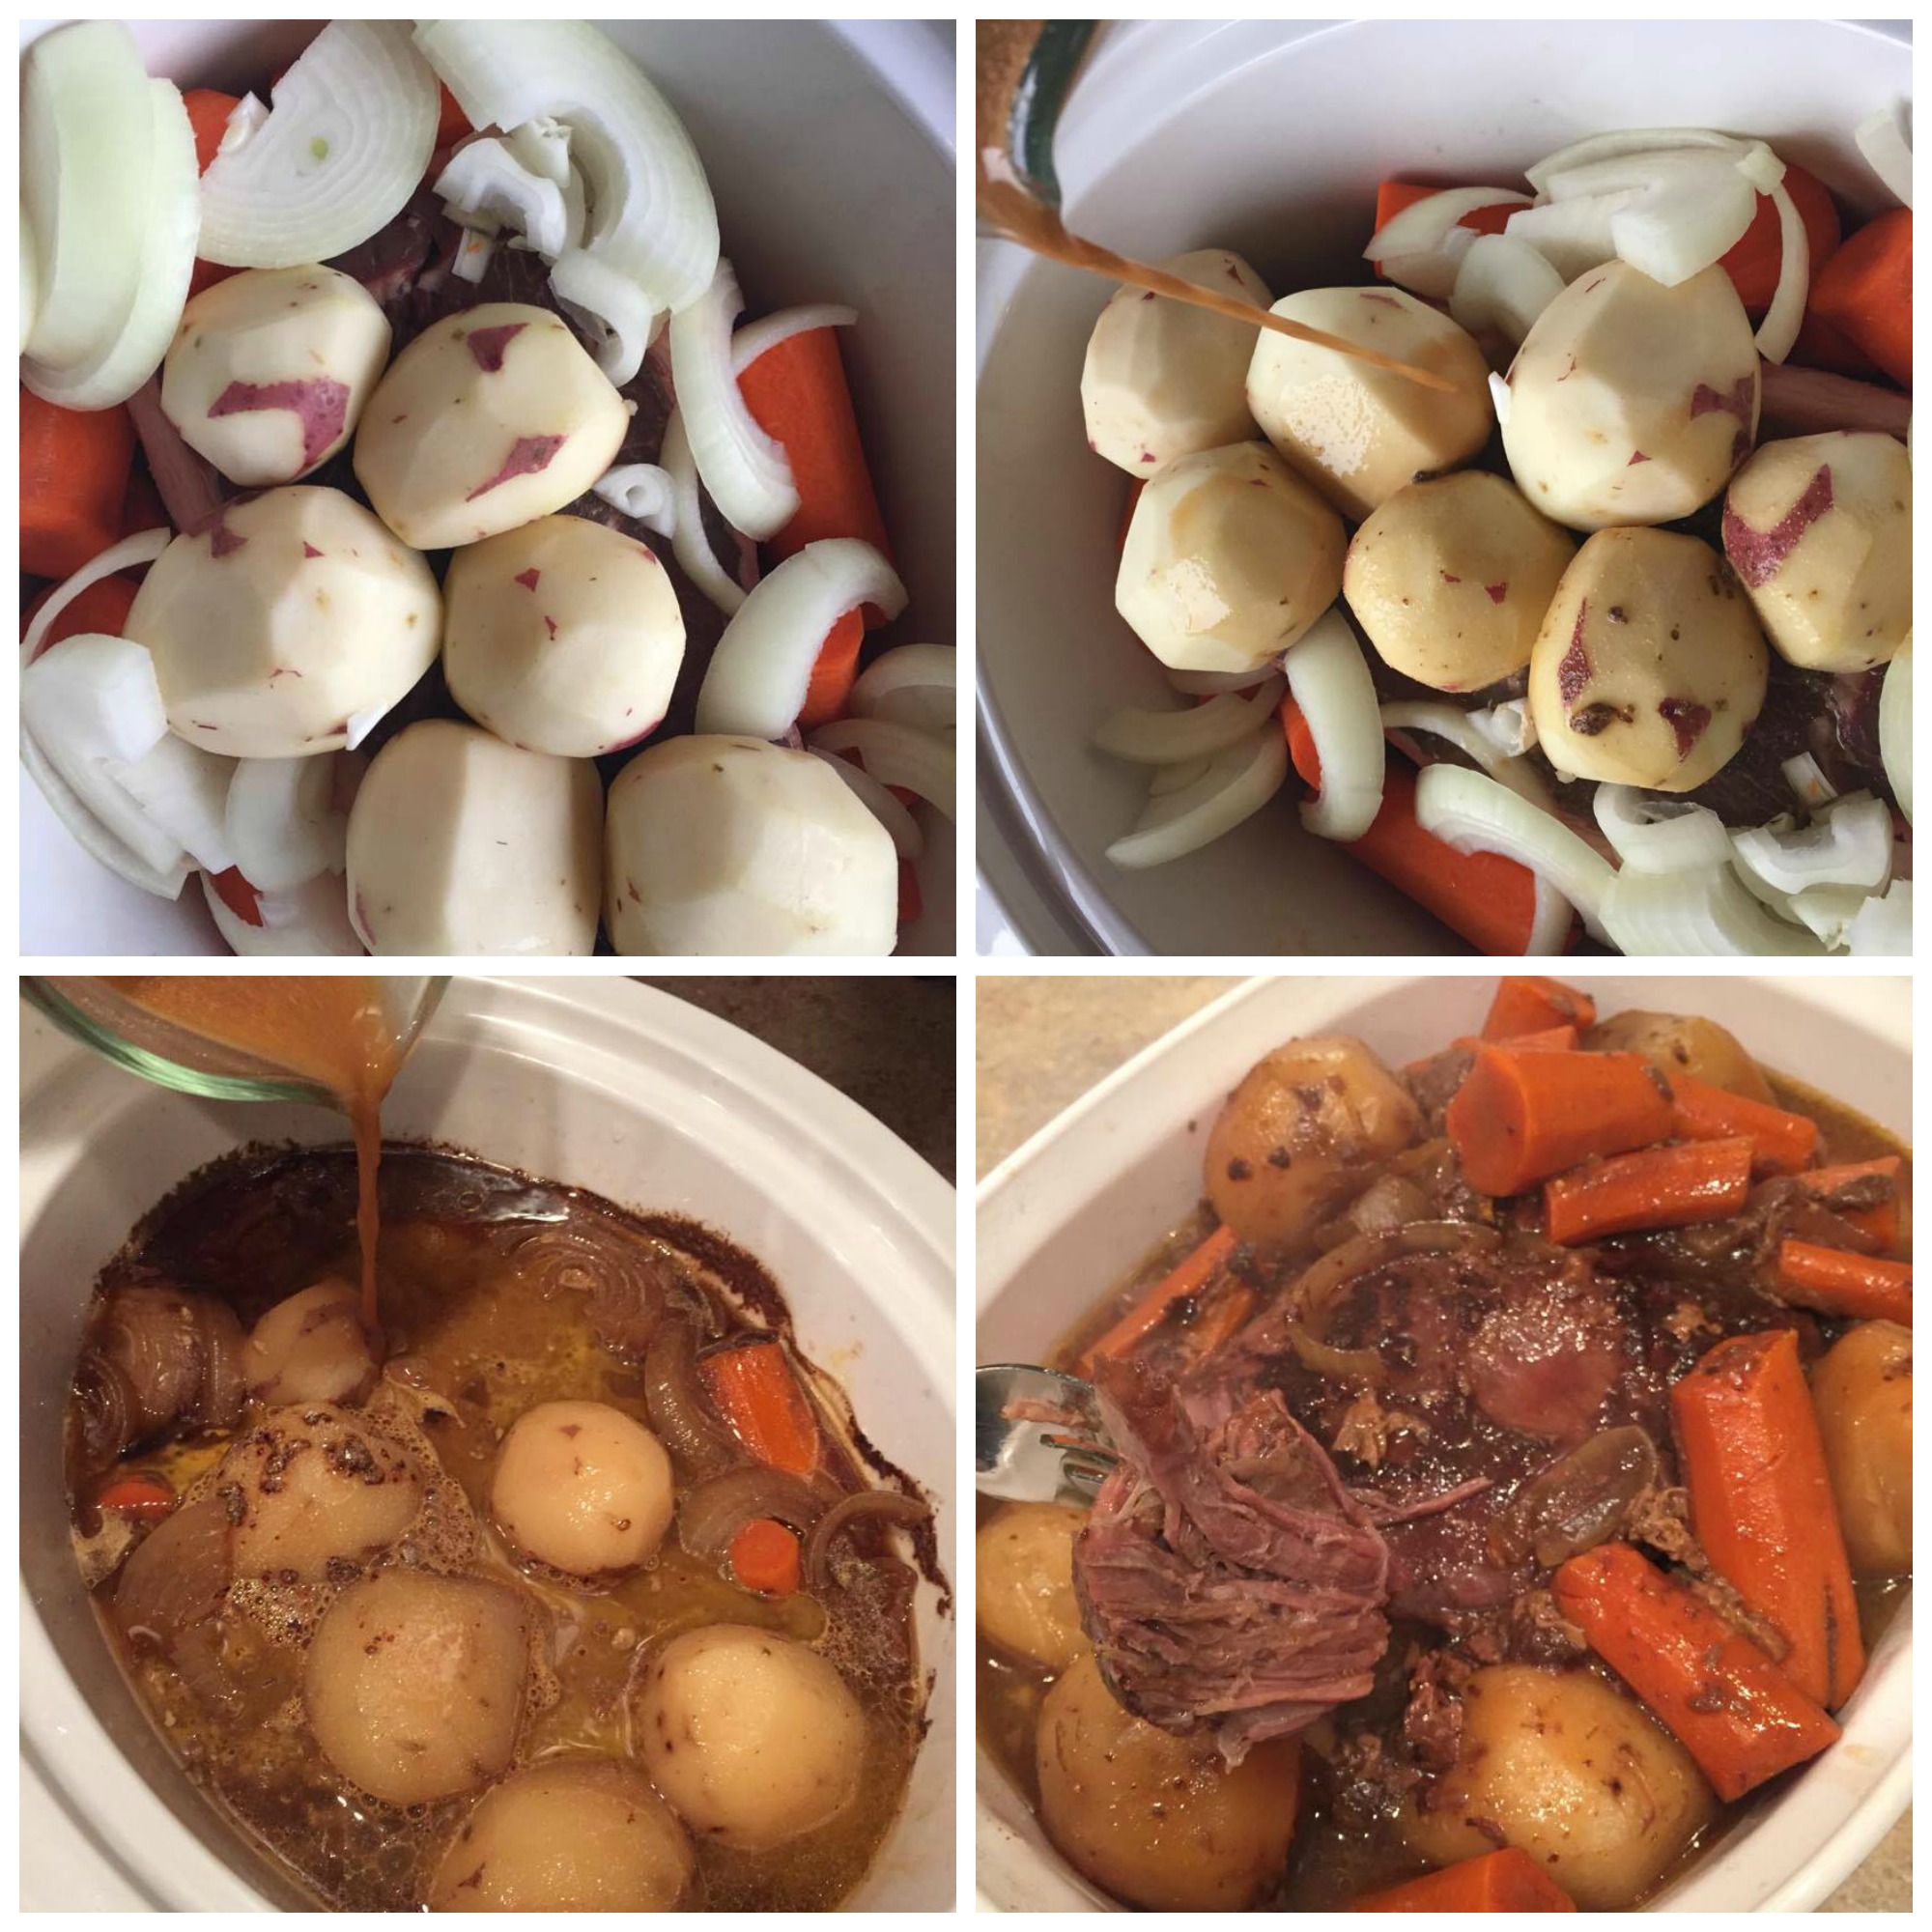
Take thirty seconds to arrange the ingredients as specified. The carrots require the most cooking, so they should be at the bottom, near the heat element, and can withstand being submerged in liquid.
The potatoes and onions do not do well when submerged in liquid for several hours, so they belong on top. If you crowd them at the bottom, they’ll be completely fallen-apart mush.
The roast belongs in the middle.
What to Know Before You Start
- I find that a 6-quart crock is the perfect size to cook a 2-3 lb roast and still fit all of the veggies. If you have a 4-quart, you may need to scale back on some of the veggies, but I’m sure it’ll be plenty filling anyway. Crowding your slow-cooker too much can result in uneven cooking. If you’re cooking a 4-5 lb roast, get a 6-8 qt slow-cooker.
- I’ve been cooking in my oval-shaped Crock-Pot 6-Quart Slow Cooker for years and find that the shape of a roast fits better than it does in a round cooker. However, a round cooker will work fine, just make sure to get a size that will accommodate the meat and veggies comfortably.
- Searing the roast isn’t necessary.
How to Know When It’s Done
When ready, the meat should be super tender and fall-apart-ish. You can shred the pot roast with a fork if you want.
If you’re having trouble deciding if it’s done, use a meat thermometer to make sure. Once the connective tissues have broken down (this will be at an internal temperature of 190°F or higher), it’s done.
Here’s an instant-read meat thermometer I’ve used a few times: ThermoPro TP03.
Ingredient Notes and Substitutions
This slow cooker beef pot roast recipe yields enough meat and vegetables to feed about 4-6.
- Chuck roast – Don’t substitute another type of meat. Use a chuck roast. You can’t make this recipe with a leaner meat – it won’t come out the same. Chuck roast is essential.
- Brown gravy mix – I like McCormick
All of the ingredients are staples that can be found at your local grocery store. There’s nothing you have to run around town looking for.
FAQ’s and Troubleshooting Tips
Can you sear a pot roast?
Yes, you can sear the pot roast in a little oil in a very hot skillet before putting it in the slow cooker. This isn’t required, but it’s nice to sear it if you have the time.
It adds another level of color and flavor. If you decide to sear it, make sure to blot the meat with paper towels.
You can’t brown meat that has moisture on the surface.
Can you overcook a pot roast in a slow cooker?
You can leave a pot roast in the crockpot longer than you should, but it probably won’t make the meat any tougher. Chances are the veggies will be super mushy and there won’t be as much liquid because some will evaporate during cooking.
Meat can be left in the cooker for 9 or even 10 hours on low and be fine. If you think you’ll be cooking the meat longer than 8 hours, you may want to cut your veggies a little larger than usual or use less of them.
Bone-in or boneless chuck roast?
Bone-in chuck roast will have a better flavor than boneless, but will have to cook a little longer. Also, a 3 lb bone-in chuck roast is not equal to a 3 lb boneless chuck roast, as the bone-in roast will have less meat because of the bone.
Can I use other kinds of potatoes?
Red potatoes hold their shape the best when cooked in the slow cooker. If you prefer to use russet potatoes, they’re OKAY to use, just cut them into larger chunks because they’re a little softer in texture.
I’ve also used Yukon Golds with good results.
Can I use baby carrots?
Absolutely. Use about 1.5 cups of baby carrots.
Baby carrots have a sweeter flavor and cook faster than full-size carrots.
How to Make Slow Cooker Pot Roast
Step 1: Prep the Slow Cooker
Spritz the inside of the slow cooker with cooking spray to prevent sticking, especially on the sides of the cooker where starches from potatoes and gravy like to cling on to. This will make for an EASIER cleanup.
If you’d rather skip spraying, you can use a disposable slow cooker insert. They’re super convenient and save you from having to scrub down your slow cooker insert after preparing this pot roast recipe.
Step 2: Layer the Vegetables and Meat
Slice onions, cut potatoes into chunks, and peel carrots if needed. Arrange carrots in an even layer on bottom of the prepared slow cooker insert.
Set chuck roast directly on top of the bottom layer of carrots. Arrange potato chunks and onions on top of and around roast.
Layering ingredients in this manner controls the rate at which they’re exposed to the liquid and heat in the slow cooker.
Step 3: Make the First Gravy
In a medium-sized bowl, combine brown gravy mix, garlic powder, and 1 cup cold water. Whisk until smooth and creamy.
My favorite brands of brown gravy are McCormick and Pioneer. Try to choose one that asks for water and not butter in the preparation.
Some brands do NOT perform as well as others. Pour gravy over chuck roast and veggies.
You can use fresh garlic instead of garlic powder, about 2-3 cloves minced. However, I’ve found that garlic powder distributes more evenly with the gravy.
This way the garlic flavor will be dispersed evenly throughout the potatoes and meat.
Step 4: Cook on Low for 7 Hours
Cover the cooker, cook on Low for 7 hours, resisting the urge to peek inside. Removing the lid lets heat escape, adding 15 to 20 minutes of cooking time each time it’s lifted.
Step 5: Add the Second Gravy
Remove the lid, combine the second gravy mix with 1 cup of cold water, then spoon this second gravy over the roast and vegetables. Continue to cook on Low for an additional 1 hour.
Step 6: Serve
It is completely normal for there to be leftover liquid. Using a slotted spoon or tongs, remove vegetables and place them onto a large platter or dish.
Remove roast, which may fall apart, which is a sure sign that it’s perfectly tender, using a spatula or tongs and place it next to vegetables. Spoon some of the crock pot gravy over the meat and vegetables and serve.
Tips for the Best Results
Trim Excess Fat, But Not All of It
Many times, a chuck roast will have a layer of fat running along one side. Some fat is good, as the fat will keep the roast moist and flavorful.
Trim away fat that’s in layers more than 1/2-inch thick and appears white and solid. Too much fat will melt away during cooking, resulting in a greasy and not just rich gravy.
Cold Water in the Gravy Mix Matters
Adding the second packet of gravy at hour seven is a technique to enrich the gravy and give it a lovely thickness. Using cold water will help the gravy to incorporate smoothly.
Hot water can cause the starch in the gravy to prematurely thicken and form lumps.
Don’t Add Too Much Liquid
This recipe calls for 2 cups of liquid, meaning a cup at the beginning and a cup at hour seven. Meat and vegetables release plenty of liquid during cooking, so adding too much will result in thin, watery gravy.
If the Gravy Is Too Thin
If after 8 hours the gravy is too thin, scoop out about 1 cup of the liquid and transfer to a small saucepan over medium-high heat. In a small cup or bowl, combine 1 tablespoon cornstarch with 1 tablespoon cold water and stir with a fork.
Whisk cornstarch mixture into gravy and continue to cook until gravy has slightly thickened, 2-3 minutes. Pour thickened gravy over pot roast and serve.
Total time: about 5 minutes.
Make It a Full Meal
This hearty and delicious pot roast recipe has it all – meat for the protein, vegetables, and a starchy food with the potatoes – making this dish a complete meal in one pot. There’s not even a need to prepare any other items to accompany this recipe, but if you’d like to round out the meal consider these ideas:
- Some crusty bread can be served alongside this dish, which is also handy if there’s extra gravy to mop up.
- A simple green salad also goes nicely with pot roast since the flavors won’t compete with the main dish.
Want to Make This Pot Roast in a Dutch Oven?
If you don’t happen to own a slow cooker, no worries. This recipe can be made in a Dutch oven, too.
Brown meat in the pot on the stove. Remove meat and add chopped vegetables and gravy ingredients (minus cornstarch), bringing liquid to a boil.
Place meat back in Dutch oven and braise in a 275°F oven until meat is fork-tender, 3-4 hours. Remove meat, prepare gravy on stove and serve.
We love our Lodge 6-Quart Enameled Cast Iron Dutch Oven for this purpose because we can brown the pot roast on the stove and braise it right in the oven – all in one pot. And cast iron will last you for decades to come.
How Should I Store the Leftovers?
Place leftovers in an airtight storage container, arranging ingredients in a shallow layer so they’ll chill faster. Use within 4 days.
For best results, keep roast submerged in the gravy to prevent drying. To freeze, remove potatoes since they don’t freeze well, becoming watery and having a strange, almost grainy texture.
Place roast, carrots, and gravy in an airtight container and freeze up to about 3 months. Defrost overnight in refrigerator before reheating.
Leftover pot roast ideas
- Make a pot roast hoagie. Shred the pot roast and spoon some of the gravy on top. Serve in a toasted hoagie roll. Serve the pot roast cold for this recipe.
- Pot roast soup: Combine the meat and veggies with broth and egg noodles or barley and simmer together. It’s a great last minute, easy soup.
- The beauty of the dish is you’ll be able to make 2-3 different meals from it.
How do I reheat leftover gravy?
To reheat leftover gravy on the stove: Since the gravy will have thickened as it cooled, you’ll want to add a splash of water or beef broth to loosen it. Place the gravy into a saucepan with a lid and reheat over medium-low heat until warmed.
Give it a taste and add additional seasoning as desired.
To reheat leftover gravy in the microwave: Place the gravy into a microwave safe bowl. Cover loosely.
Microwave for 1 minute at a time, stirring between rounds. Season to taste before serving.
The meat from the roast will reheat well using either method.
Variations Worth Trying
Add Mushrooms
For a mushroomy pot roast, top with 8 oz cremini or button mushrooms. Quarter, or halve if small, the mushrooms and lay them on top of the roast.
They will cook down into tender morsels, ready to scoop up some gravy.
Add Fresh Herbs
Add a couple of bay leaves to the pot, or tuck in some sprigs of fresh thyme next to the roast for added flavor. Remove the herbs before serving.
Rosemary has a powerful flavor and can easily take over this dish.
Use Beef Broth Instead of Water
Substitute beef broth for water for a beefier gravy. Use low-sodium beef broth so it doesn’t get too salty since the brown gravy mix is pretty salty.
Taste and season before serving.
Add Celery
I know a couple of people who add celery to their roast. Lay a couple of sliced (2-inch pieces) celery stalks on the bottom with the carrots.
Some like it, some feel it takes away from the gravy. Try it once and decide for yourself.
Frequently Asked Questions
Can I use a frozen roast?
Any meat put into a slow cooker should be completely defrosted, otherwise it stays in the “danger zone”, the range of temperature between 40 and 140 degrees Fahrenheit in which bacteria thrive, longer than is safe. Defrosting in the refrigerator, ideally, is the best way to prepare meat before cooking.
Defrosting overnight is best.
My pot roast came out of the crockpot tough. What did I do wrong?
Pot roasts cut from beef chuck take a full eight hours on low to break down the connective tissues in the meat. If it’s still tough after eight hours on low, give it another hour.
Some cuts of beef are much leaner than chuck roast; unfortunately, these will not get as tender no matter how long they’re cooked. If you cooked the beef for only four or five hours on high, this can happen, too; while the meat will be cooked through and sliceable, it won’t be as tender as slow-cooked beef because the connective tissues haven’t been cooked long enough to become tender.
Cook on low if you want a fall-apart tender pot roast.
Can you prepare this recipe the night before?
Assemble all ingredients except the water/cornstarch mixture used to make the gravy in the insert of your slow cooker and store in refrigerator overnight. In the morning, wrap insert in a large dish towel and leave on counter about 15 minutes to remove chill, which helps your crock pot come up to cooking temperature quicker.
Make gravy mixture and pour over ingredients. Remove insert from dish towel, place into slow cooker, and turn on as directed.
How do you make the gravy?
Once pot roast is complete, transfer to a platter and pour cooking liquid into a saucepan. Bring to a boil, reduce heat and simmer for a few minutes.
Add corn starch mixed with cold water, which should be smooth with no lumps, and continue to cook for 2-3 minutes over medium heat, stirring frequently. Remove from heat.
Serve over pot roast.
As a tip, mix 1 tablespoon cornstarch with 1 tablespoon of cold water. Make sure there are no lumps before adding to your cooking liquid.
This mixture is sometimes referred to as a “slurry”.
If your gravy ends up being a little too watery, I recommend taking the lid off the crock during the last 30-45 minutes of cooking. This will allow some of the liquid to evaporate and concentrate.
Can I add wine to this recipe?
You can substitute half of the water for a nice, dry red wine. We used Cabernet Sauvignon, but any nice, drinkable red would be good.
Merlot would be good, too. Wine adds some nice complexity to pot roast, plus a hint of acidity to compliment the richness of the beef.
Just make sure not to use “cooking wine”, which contains salt and who knows what else. Use a wine you’d be willing to drink.
What if my slow cooker runs hot?
Some slow cookers’ “low” setting is more like a medium heat. If your slow cooker seems to be running fast, check on the roast after 6 hours to make sure the meat is falling-apart tender.
If you have an instant-read thermometer like this ThermoPro one, you’ll be looking for an internal temp of 195-200°F, which indicates the collagen has broken down.
Related Recipes
If you like this fuss-free slow cooker pot roast recipe, I’m sure you’ll enjoy these other fuss-free recipes too.
- beef stew if you like it more broth-y with lots of veggies.
- slow cooker pulled pork is perfect for a crowd.

Slow Cooker Pot Roast
Ingredients
- 2 to 3 pounds beef chuck roast
- 4 to 6 red potatoes peeled
- 4 to 5 large carrots peeled and cut into 2-inch pieces
- 1 medium onion sliced
- 1 teaspoon garlic powder
- 2 packets brown gravy mix
- 2 cups cold water divided
- Cooking spray
Instructions
- Spray the inside of the slow cooker with cooking spray.
- Place carrots on the bottom of the slow cooker. Set chuck roast on top of the carrots. Scatter potatoes and onion around and over the roast.
- Whisk 1 packet brown gravy mix with 1 cup cold water and garlic powder until smooth. Pour over roast and vegetables.
- Cover and cook on Low for 7 hours without lifting the lid.
- At the 7-hour mark, whisk the second packet of brown gravy mix with the remaining 1 cup cold water. Pour over the roast.
- Cover and cook on Low for 1 more hour.
- Transfer vegetables to a platter with a slotted spoon or tongs.
- Lift out roast carefully, spoon gravy over everything, and serve.